


4
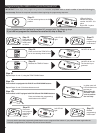
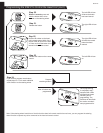
Step 18.
Press and
hold program-
ming/mode
button on
SWI-X.
Left LED will
light.
Step 19.
Release
programming/
mode button.
37)8
37)8
37)8
You only need to press the programming/mode button once to program all the buttons. If you press this button again after the
interface is programmed, it will erase all previous learned buttons.
37)8
37)8
37)8
37)8
37)8
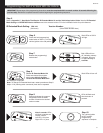
If you programmed the interface for version #4, proceed with the following steps.
If you did not program the interface for version #4, skip to Step 18.
Step 12.
Press and hold
programming/
mode button
on SWI-X.
Step 14.
Press and hold the TEMP UP but-
ton on the steering wheel control.
Left LED will turn off.
Left LED will
light.
Step 13.
Release
programming/
mode button.
Step 15.
Release the TEMP UP button.
Left LED will turn on.
The function is pro-
grammed.
Step 16.
Repeat Steps 14 and 15, using the TEMP DOWN Button.
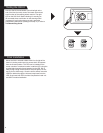
Step 17a.
If the vehicle is equipped with FAN UP and FAN DOWN buttons:
Repeat Steps 14 and 15 for these buttons as well.
Step 17b.
If the vehicle is NOT equipped with FAN UP and FAN DOWN buttons:
Press and release the programming/
mode button on the SWI-X.
37)8
37)8
In either case, left
/('ZLOOÀDVKRQFH
and stay on.
Skip to Step 20.
You have 7 sec-
onds to perform
the next step.
37)8
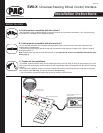
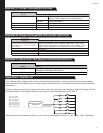
Programming the SWI-X to Control the Head Unit
IMPORTANT! Some steps of the programming instructions must be completed within a certain number of seconds following the
previous step. Review the complete instruction before beginning the programming sequence.
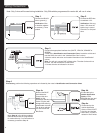
Step 11.
Turn the vehicle ignition to the ON
position.
/('VZLOOÀDVKWR
indicate set version
number. Left LED: 10’s
place
Right LED: 1’s place
OFF
ACC
IGN
STRT
TEMP
TEMP