


12
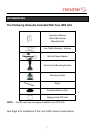
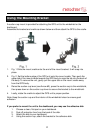
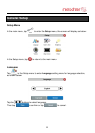
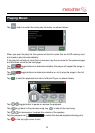
Using The Mounting Bracket
A suction cup mount is provided for attaching the GPS unit to the windshield or the
dashboard.
Assemble the bracket and cradle as shown below and then attach the GPS to the cradle.
1. Fig. 1 Slide the mount cradle onto the end of the mount bracket. It will snap into
place.
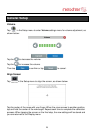
2. Fig. 2 Set the bottom edge of the GPS unit onto the mount cradle. Then push the
upper tab of the mount cradle towards the GPS body to snap the tab into the back of
the body. To remove the unit, gently pull the upper tab on the mount cradle away
from the GPS body.
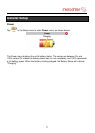
3. Raise the suction cup lever (see Arrow #2), press the suction cup to the windshield,
then press down on the suction cup lever to secure the bracket to the windshield.
4. Lastly, rotate the cradle to adjust the GPS unit to proper position.
Note: Keep the suction cup and the interior of the windshield clean to ensure good
adhesion.
If you prefer to mount the unit to the dashboard, you may use the adhesive disk
1. Choose a clean, flat spot on your dashboard.
2. Peel off protection liner from the back of the disk.
3. Attach the disk to your dashboard.
4. Using the suction cup, attach the bracket to the adhesive disk.