


4
Structure of the operator’s manual
This manual is divided into 5 main sections:
› Description of the unit and installation brackets
› Pairing with Bluetooth devices
› Using the features of Bluetooth devices
› Using the wire audio input
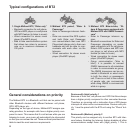
› Special configurations
To easily configure your BT2 unit, please follow the sequence
of steps described below:
› Step 1: fix the unit onto your helmet following the instruc
-
tions provided in the “Fixing the unit onto the helmet” sec
-
tion.
› Step 2: pair the Bluetooth devices (for example a cell
phone or GPS) with the BT2 unit. Follow the procedure
described in the chapter: “Pairing with Bluetooth devices”,
choosing the Bluetooth devices you are using.
› Step 3: after completing the pairing operation, go to the
“Using the features of the Bluetooth devices” section,
choosing Bluetooth devices you are using.
› Step 4: if you have a wired audio input, read chapter “Using
the wire audio input”.
› Step 5: for information on how to use the advanced featu
-
res, read the “Special configurations” chapter.
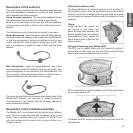
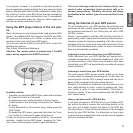
Charging batteries
Make sure that the unit is fully charged before use. Allow at
least 5-6 hours for a full charge before using the unit for the
first time. Normally, after the first time, it takes 4 hours for a
full charge.
Charge the unit by inserting the wall-charger into the charging
socket (lift the rubber cover to insert the plug).
› The red LED on the unit will start flashing when charging
begins.
› Allow the headset to charge until the red LED turns off.
› When the charge is complete, release the headset from
the charger.
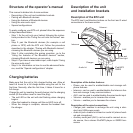
Description of the unit
and installation brackets
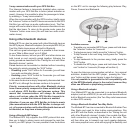
Description of the BT2 unit
The BT2 has 5 multifunction buttons on the front and 3 wired
connections in the lower section.
Description of the button features:
› Phone: can be used to enable/disable and manage cell
-
phone features
› Intercom: can be used to enable/disable the Intercom fea
-
ture and manage 3-way communications
› AUX: can be used to enable/disable the wired audio input
› Volume+: enables you to increase the volume
› Volume -: enables you to decrease the volume
Description of the wired connections
› Charger jack: enables to recharge the unit using a stan
-
dard mini USB power supply
› Audio kit jack: enable to connect an audio kit (stereo head
-
set and microphone)
› Auxiliary audio jack (AUX): can be used to connect an au
-
dio source, like a stereo iPod/MP3 player or GMRS tran
-
sceiver
Charger
Audio kit
iPod/MP3
GMRS
Phone
Intercom
AUX
Volume +
Volume -
Red and
blue light