


16 PREPA
RATION
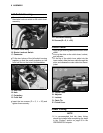
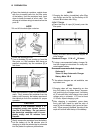
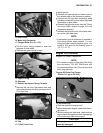
A. Hold the brake pedal applied.
B. Quickly open and close the bleed valve.
C.
Release the brake pedal.
•
When air bleeding is finished, check that the
fluid level is between the upper and lower
level lines.
•
Tighten the bleed valve to the specified
torque.
Torque: 7.8 N·m (0.80 kgf·m, 69 in·lb)
•
Install the diaphragm and reservoir cap.
NOTE
żFirst, tighten the rear brake fluid reservoir cap
clockwise by hand until slight resistance is felt
indicating that the cap is seated on the reser-
voir body, then tighten the cap an additional
1/6 turn while holding the brake fluid reservoir
body.
•
Apply the brake forcefully for a few seconds,
and check for fluid leakage around the fittings.
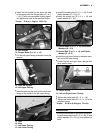
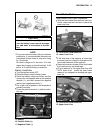
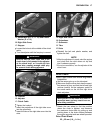
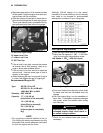
Seat Installation
•
Insert the three tabs on the seat into the slots.
A. Seat
B. Tabs
C. Slots
D. Hook
E. Latch
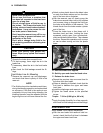
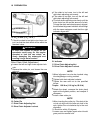
•
Insert the hook at the rear of the seat into the
latch, and push down the rear part of seat until
the lock clicks.
•
Pull up the rear end of seat to make sure it is
securely locked.
NOTE
żIf the
re is difficulty removing the ignition key
from the seat lock, turn it lightly counterclock-
wise while pulling it out.
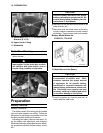
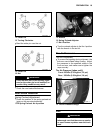
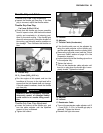
Clutch Lever and Cable
Clutch Lever Free Play Inspection
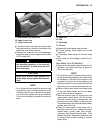
•
Check that the clutch lever has the specified
amount of free play as shown in the figure.
Clutc
h Lever Free Play:
2
a
3 mm (0.08
a
0.12 in.)
A. Locknut
B. 2
a
3mm(0.08
a
0.12 in.)
C.
Adjuster
•
If the free play is incorrect, adjust the free
play.
Clutch Lever Free Play Adjustment
•
Turn the adjuster so that the clutch lever will
have 2 a 3 mm (0.08 a 0.12 in.) of free play.
•
If it cannot be done, use the adjuster at the
middle of the clutch cable.
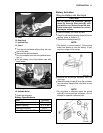
•
Remove the socket bolt (D = 5, L = 16) and
plastic washer (D = 5.3).
•
Pull the right side cover outward to clear the
stopper, and then remove the right side cover.