


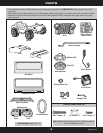


ASSEMBLY
2
4
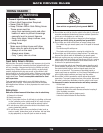
BOTTOM VIEW
3
Childrencanbeharmedbysmallparts,
sharpedgesandsharppointsinthevehicle's
unassembledstate,orbyelectricalitems.
Careshouldbetakeninunpackingand
assemblyofthevehicle.Childrenshouldnot
handleparts,includingthebattery,orhelpin
assemblyofthevehicle.
WARNING
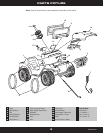
1
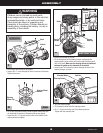
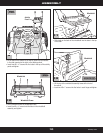
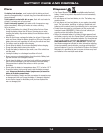
• Fit the top and bottom steering wheel together. Make sure both
the holes and the spokes in the steering wheel are aligned.
• Insert four #6 x
1
/
2
" screws into the holes in the bottom of the
steering wheel and tighten.
• Fit the dash onto the top of the vehicle.
• Insert a #8 x 1" screw through the hole in each end of the dash.
Tighten the screws.
Steering Wheel
Bottom
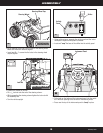
• Position the vehicle on its side.
• Fit the straight end of the steering column up through the
square opening in the vehicle and out through the large round
hole in the dash.
Make sure the steering column is positioned
between the guides on the underside of the vehicle.
• Insert the end of the steering column through the hole in the
steering linkage, as shown.
Guide
Square
Opening
Steering
Column
Steering
Column
Guide
Steering
Linkage
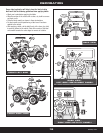
• Turn the vehicle upright.
• Fit the steering wheel onto the steering column.
• Fit a
3
/
16
"
lock nut onto the end of the steering column.
Tighten with the assembly tool.
Steering Wheel
Lock Nut
Steering
Wheel Top
Dash
Steering Column
Vehicle
8
N9356pr-0920