


10 03524832_ed13
Maintenance Section
WARNING
Always wear eye protection when operating or performing any maintenance on this Starter.
Always turn o the air or Gas supply and disconnect the air supply hose before installing, removing or adjusting any accessory on this
Starter or before performing any maintenance on this Starter.
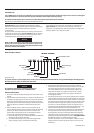
Note: When reading the instructions, refer to exploded diagrams in parts Information Section when applicable.
Lubrication
Each time a Model 150BMG Starter is disassembled for
maintenance or repair, lubricate the starter as follows:
1. Lubricate all open bearing and gear teeth with a liberal coat of
Ingersoll Rand No. 130 Grease.
2. Cover the bore of the Motor Housing Cover (1) with
Ingersoll Rand No. 130 Grease.
3. Apply a thin lm of Ingersoll Rand No. 130 Grease to the Drive
Shaft (32) and the bore of the Drive Shaft Front Bearing (34), Drive
Shaft Collar (33) and Drive Gear (19).
4. Wipe a thin lm of Ingersoll Rand No. 130 Grease on the Drive
Gear Thrust Washer (19A).
5. Apply about 8 ounces of Ingersoll Rand No. 130 Grease to the
assembled Drive Gear (19) and a uniform coat to the
Drive Shaft (32) working the grease between all gear teeth,
splines and bearing surfaces.
6. Wipe a thin lm of Ingersoll Rand No. 130 Grease in the bore of
the Drive Housing (27).
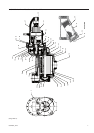
Disassembly of the Starter
General Instructions
1. Do not disassemble the starter any further than necessary to
replace worn or damaged parts.
2. When grasping a part in a vise, always use leather covered or
copper-covered vise jaws to protect the surface of the part and
help prevent distortion. This is particularly true of threaded
members.
3. Do not remove any part which is a press t in or on a
subassembly unless the removal of that part is necessary for
replacement or repairs.
4. Always have a complete set of seals and O-rings on hand before
starting any overhaul of a Model 150BMG Starter. Never reuse old
seals or gaskets.
5. Always mark adjacent parts on the Motor Housing Cover (1),
Motor Housing (14), Gear Case (15) and Drive Housing (27) so
these members can be located in the same relative position when
the starter is reassembled.
6. Never wash the Starter Drive (31) in a solvent.
7. Do not press any needle bearing from a part unless you have a
new needle bearing on hand for installation. Needle bearings are
always damaged during the removal process.
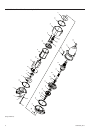
Disassembly of the Motor
1. Unscrew the Motor Housing Cover Cap Screws (5).
2. Pull the Motor Housing Cover (1) from the Motor Housing (14).
3. Slide the Motor Housing from the motor.
4. Grasp the rear end of the motor and pull the entire assembly
away from the Gear Case (15).
5. Position the motor assembly vertically, grasping the Rotor Pinion
(36) in leather-covered or copper-covered vise jaws.
6. Remove the Rear Rotor Bearing Retainer (9).
7. The Rear Rotor Bearing (8) is press t on the rotor shaft. Use a
bearing puller to remove it.
8. Lift o the Rear End Plate (10) and Cylinder (11) and remove the
Vanes (13) from the slots in the Rotor.
9. Reposition the Rotor vertically, pinion end up, and grasp the
short hub in leather-covered or copper-covered vise jaws.
10. Remove the Rotor Pinion Retainer (35) and lift o the
Rotor Pinion (36).
11. Support the Front End Plate (39) as close to the Rotor as possible,
and press the Rotor from the Front Rotor Bearing (37). Do not let
the Rotor fall when it is pressed free.
Disassembly of the Gear Case
1. Set the gear case and drive housing unit upright on the
workbench with the Drive Housing (27) upward.
2. Remove the Drive Housing Cap Screws (24) and Drive Housing
Cap Screw Lock Washers (23) and lift o the Drive Housing, Drive
Gear and Starter Drive.
3. Thread a 5/16”-18 thread cap screw into the tapped hole in the
Bearing Ejecting Washer (16) and continue to turn it until the
Drive Shaft Rear Bearing (18) is jacked from the Gear Case (15).
Disassembly of the Drive Housing
1. With the Drive Housing unit lying on the workbench, grasp the
Drive Gear (19) and pull the assembled Drive Shaft (32) from the
Starter Drive (31).
2. If the Drive Gear must be removed from the Drive Shaft, support
the Drive Gear on the table of an arbor press, and press the Drive
Shaft from the Drive Gear. Remove the Drive Gear Key (20).
3. Stand the Drive Shaft assembly, bearing end up, in a sleeve that
contacts the Drive Shaft Collar (33), and press the Drive Shaft
from the bore of the Drive Shaft Front Bearing (34).
4. Position the Drive Housing (27) vertically, grasping the Gear Case
Cover (21) in leather-covered or copper-covered vise jaws. Tap
the underside of the drive housing mounting ange with a soft
hammer to dislodge the Drive Housing from the Gear Case Cover.
Lift o the Drive Housing. The Starter Drive will probably remain
with the Drive Housing; make certain that it does not fall on the
oor.
NOTICE
Do not remove the Drive Shaft Grease Seal (22) from the Gear
Case Cover unless it is absolutely necessary and you have a new
Seal on hand. If the Seal must be removed, press it from the Gear
Case Cover.
5. Do not remove the Drive Housing Bearing (30) from the Drive
Housing unless you have a new Bushing on hand. If the Bearing
must be removed, press it from the Drive Housing.
Cleaning the Parts
Once the Starter has been disassembled, clean all parts for
inspection.
1. Wipe all dirt, grease, etc. from the Starter Drive and sealed
bearings.
NOTICE
Do not wash these parts in kerosene or other solvent, as this will
dilute and contaminate any sealed-in lifetime lubricant.
2. Wash all parts except the Start Drive or any sealed bearing in
clean kerosene or other solvent. Dry the parts with compressed
air.