


10
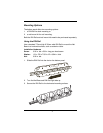
Using the Wall Mount Kit
You need to purchase two wall mount kits that each contain:
• a mounting bracket,
• three screws, and
• six washer/nut sets.
You need two kits so that you have two mounting brackets–one for each
end of the device–and enough screws (4) and washer/nut sets (8).
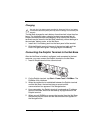
The mounting bracket contains an open slot between the back and
bottom wedges to accommodate the connector cables.
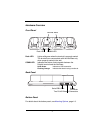
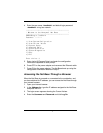
To Mount a ChargeBase Device
1. Attach the mounting bracket to the wall using the Recommended
Hardware (see page 1-10).
2. On each end of the ChargeBase device, insert a screw into the
round end of each of the four screw slots on the bottom panel.
Then, slide each screw towards the narrow end of the slot until it
snaps in place.
3. Use a washer/nut set on each of the four screws to secure the
screw in the slot.
4. Place the ChargeBase device on the mounting bracket; match the
holes up with the secured screws.
5. Use the remaining washer/nut sets on each of the four screws to
secure the ChargeBase device to the mounting bracket.
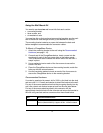
Recommended Hardware
If a metal or wood stud is present, drill a 3/32 in. pilot hole into the stud
and use a #6 X 1 1/2 screw and washer to attach the bracket to the wall.
For any of the screws positioned so that they are going directly into dry
wall, use a sheet rock anchor/screw set such as the one listed below.
For any of the screws attaching directly into concrete, drill the
appropriately sized pilot hole into the concrete and secure the bracket to
the wall using concrete anchor screws such as those listed below.
Wall Recommended Anchors
Sheet Rock Buildex E-Z Anchor Stud Solver Medium Duty Drywall
Anchor (Model #25216); supports 50 lbs., screws included