


SKU 45009, 92261 For technical questions, please call 1-800-444-3353 Page 5
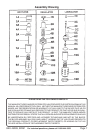
4. Verify that the air Filter Element (4A) is in place on the Filter Body (1A), then
place the Plastic Bowl (7A), labeled Air Filter, inside the Metal Guard (9A).
5. Slide the Upper Lid (10A) over the Metal Guard (9A) and place into the Filter
Body (1A). Securely tighten the Upper Lid (10A) by turning clockwise.
6. Place the oiler Plastic Bowl (10C), with O-ring (9C), into the Metal Guard
(12C).
7. Slide the Upper Lid (13C) over the Metal Guard (12C) and place into the
Lubricator Body (6C). Securely tighten the Upper Lid (13C) by turning
clockwise.
8. Secure the unit assembly by the Mounting Bracket (11B) to a flat surface
using the appropriate hardware (not supplied).
9. Remove the Oil Plug (2C) on top of the Lubricator Body (6C) and add air
lubricator oil to the maximum level. Replace Oil Plug.
Air Connections
Caution: Avoid injuries. Before connecting this unit to the air compressor, be
certain that the air compressor is unplugged from the power source, and all
pressure is released from its tank.
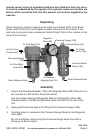
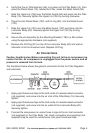
The illustration below shows the general connection for the Air Filter-Regulator
and Lubricator.
1. Apply pipe thread seal tape to the both ends of a double-sided connector
(not supplied), and screw into the air inlet of the Filter Body (1A). Securely
tighten.
2. Apply pipe thread seal tape to the both ends of a double-sided connector
(not supplied), and screw into the air outlet of the Lubricator Body (6C).
Securely tighten.
3. Connect the compressor air output hose or pipe to the air inlet connector
(not supplied) on the Filter Body (1A). Quick connectors and couplings (not
supplied) may be used for convenience. Use pipe thread seal tape.