


Page 9SKU 66242 For technical questions, please call 1-800-444-3353.
onto the ground. (See Assembly
Diagram.)
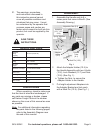
Lower the Bottle Jack completely 3.
(Be aware that it will take a good
amount of effort to lower the ram
down to be level with the reservoir).
Do not hammer on the ram. Store
the Jack in a clean, dry, safe location
out of reach of children and other
unauthorized people.
MAINTENANCE AND
SERVICING
Procedures not specically
explained in this manual
must be performed only by a
qualied technician.
TO PREVENT SERIOUS
INJURY FROM ACCIDENTAL
OPERATION:
Disconnect the Bottle Jack
from its compressed air supply
source and turn the Knob (6.11)
assembly counterclockwise
to loosen the Release Valve
Screw before performing any
inspection, maintenance, or
cleaning procedures.
BEFORE EACH USE,1. inspect the
general condition of the Bottle Jack.
Check for loose screws, misalignment
or binding of moving parts, cracked or
broken parts, damaged Air Hose, and
any other condition that may affect its
safe operation.
AFTER USE,2. clean external surfaces
of the Bottle Jack with a clean, moist
cloth and a mild detergent. Do not
use solvents.
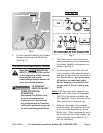
BLEEDING INSTRUCTIONS:
Before each use or when the Bottle 3.
Jack lacks in performance, make
sure to check for excessive air and
proper hydraulic oil level in the Bottle
Jack. If the Jack appears not to be
working properly, it may be neces-
sary to purge its hydraulic system of
excessive air. To do so:
Grasp the handle and pump it up and 4.
down quickly 5-6 times. Then turn
the Knob (6.11) 1-1/2 turns counter-
clockwise releasing pressure.
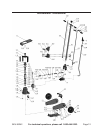
(See Assembly Diagram.)
Remove the Filler Plug (1.19), and 5.
ll the Cylinder Base (1.14) reservoir
with hydraulic oil (not included).
(See Assembly Diagram.)
Rapidly pump the Handle several 6.
times to purge air from the system.
(See Assembly Diagram.)
Turn the Knob (6.11) clockwise until 7.
snug to hold pressure.
(See Assembly Diagram.)
Top off the reservoir with hydraulic oil. 8.
Then replace the Filler Plug (1.19).
(See Assembly Diagram.)
IMPORTANT: After bleeding the Bottle
Jack, test the Jack for proper op-
eration prior to its actual use.
NOTE: To prevent damage to the Bottle
Jack, check for excessive air and/or
low hydraulic oil regularly.
WHEN STORING, 9. turn Lock
Lever (6.5) to it’s open position
(counterclockwise). Always store the
Bottle Jack and its accessories in a
clean, dry, safe location out of reach