


SKU 167 For technical questions, please call 1-800-444-3353 PAGE 8
INSPECTION, MAINTENANCE, AND CLEANING
1. WARNING! Always wear ANSI approved safety impact goggles when
performing any inspection, maintenance, or cleaning procedures.
2. WARNING! Prior to performing any inspection, maintenance, or cleaning of
the Riveter, make sure to disconnect the air hose from the tool. Then, squeeze the
Trigger (40) again to release any compressed air in the Riveter.
3. To clean the exterior of the Riveter, wipe with a clean, damp cloth using a mild
detergent or mild solvent. Do not immerse the tool in liquids.
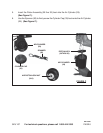
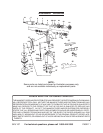
4. To clean and change the Jaws:
A. Unscrew and remove the Frame Head (11), using the Spanner (36).
(See Assy. Diagram.)
B. Use the Spanner (36) to unscrew and remove the Jaw Case (6). Use care as
there is a Spring (10) behind the Jaw Case (6) which may fly out.
(See Assy. Diagram.)
C. Remove the Jaws (7) from inside the Jaw Case (6).
(See Assy. Diagram.)
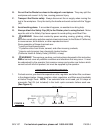
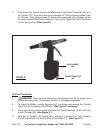
6. Insert the small end of a rivet fully through the Nosepiece (1A, 1B, 1C, or 1D).
CAUTION! Make sure to NEVER to touch the Trigger (40) when you are inserting
rivets. (See Figure D.)
7. Insert the rivet through the predrilled hole in the workpiece.
8. Hold the Riveter firmly with both hands, and squeeze the Trigger (40) to activate the
Riveter. Repeat as necessary. Then, release pressure on the Trigger.
(See Figure D.)
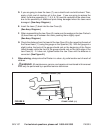
9. When finished using the Riveter, turn off the air compressor. Squeeze the Trigger
again to release any compressed air in the Riveter. Disconnect the air hose from
the tool. Then, store the Riveter in a clean, dry, safe location out of reach of children.
(See Figure D.)