


This detailed check takes about two and one-half
hours. It’s important to check a representative tractor
and trailer each time you order equipment.
K
eeping an eye on your brake service records will also
flag imbalance problems. If you are seeing 300,000
miles on tractor linings and 70,000 miles on trailer
linings, there’s obviously an imbalance problem.
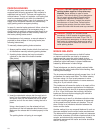
OIL SEALS AND HUB CAPS
OIL SEALS
Oil seals vary in design and installation. Refer to the
seal manufacturer’s manual for proper installation with
proper tool.
To insure leak-free operation replace oil seals each
time you remove a hub. Never reuse seals, even if
they show no signs of leakage.
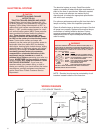
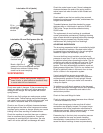
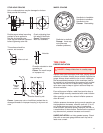
HUB CAP INSTALLATION
1. Clean the hub cap and the face of the hub.
2. Position the gasket.
3. Install the hub cap. If you are installing a transparent
hub cap, install the reinforcing ring on the outside.
Install the capscrews and lockwashers. When
installing a transparent hub cap, do not tighten to
exceed 15 lb-ft torque.
4. Remove the fill plug and pour oil to the level
specified on the cap. Allow sufficient time for the
oil to seep into the hub cavity and recheck.
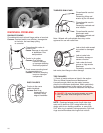
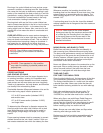
WHEEL BEARINGS
ADJUSTMENT
For maximum bearing life, adjust and lubricate bearings
properly at regular intervals depending upon trailer
speeds, loads, and general operating conditions.
1. Clean bearings, hub, and seals.
2. Replace any worn or damaged parts.
3. Pack hub and bearings with specified lubricant.
4. Assemble bearings and hub on axle sleeve.
5. Install thrust washer if used.
6. Install wheel bearing adjusting nut. Thread nut
against bearing or thrust washer as you rotate
wheel. Be sure there is sufficient clearance
between brake shoe and drum so brake shoe
drag will not interfere with bearing adjustment.
7. Tighten adjusting nut to 50 lb-ft torque while you
rotate hub in both directions to be sure all bearing
surfaces are in contact.
8
a. For axles that have single-nut construction, back
off adjusting nut 1/8 to 1/6 turn. Cotter pin (or lock)
nut in place.
8
b. For axles that have double-nut lock construction,
back off adjusting nut 1/6 to 1/4 turn. Assemble
wheel bearing nut lockwasher.
A) For assemblies using a bending type lock-
washer, tighten jam nut with torque wrench
as follows:
Torque Lb-Ft
Nut Size Minimum Maximum
1-1/8" to 2-5/8" 100 150
2-5/8" and over 100 200
Bend lockwasher over both adjusting and jam nuts to
complete the assembly.
B) For assemblies using a dowelled adjusting nut
and pierced lockwasher, tighten jam nut with a
torque wrench as follows:
Torque Lb-Ft
Nut Size Minimum Maximum
1-5/8" to 2-5/8" 200 300
2-5/8" and over 250 400
9. For single nuts with lock features built into the nut
(ie. Pro Torque, Axilok), refer to the vendor
maintenance manual.
10. Keep the resulting end play within limits of .001"
to .003".
NOTICE: Never reuse a gasket.
11
WARNING Failure to back off the inner
adjusting nut could cause bearing and axle
spindle overheating or damage, which could
result in the wheel locking up or coming off
during vehicle operation.
WARNING Failure to torque the outer lock nut
properly could cause the wheel to come off
during vehicle operation.
NOTICE: Remove the set screw lock device in
the serrated nut prior to attempting jam nut
removal. Make sure to replace allen screw to
prevent torque loss. Never use hammer and
chisel to remove axle nuts.