


• If you like a song, select to hear more songs like it.
• If you dislike a song, select to prevent it from being
played in the future.
Changing Stations
1
Select Apps > Pandora®.
2
Select .
3
Select a station.
Tracks
A track is a recording of your path. The track log contains
information about the recorded path, including time, location,
and elevation information.
Viewing Track Information
1
Select Apps > Tracks > Active.
2
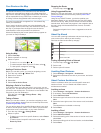
Select a track.
The track is displayed on the map.
3
Select .
4
Select an option:
• To save the track, select Save Track.
• To save the track as a trip, select Save as Trip.
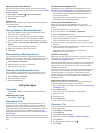
• To view an elevation plot of the track, select Elevation
Profile.
TracBack
®
Following Your Recent Track
The TracBack feature records a track of your recent movement.
You can retrace your recent track back to where you started.
1
Select Apps > TracBack.
Your recent track appears on the map.
2
Select Go!.
Saving Your Recent Track as a Trip
You can save your recent track as a trip, which you can
navigate later using the trip planner (Navigating to a Saved
Trip).
1
Select TracBack.
Your recent track appears on the map.
2
Select > Save as Trip.
3
Enter a name, and select Done.
Tire Pressure
WARNING
Use of the Tire Pressure Monitor System is not a substitute for
proper tire maintenance, and it is the driver's responsibility to
maintain correct tire pressure, even if under-inflation has not
reached the level to trigger the low tire pressure alert. Failure to
maintain proper tire pressure can result in loss of control of the
vehicle, which may lead to serious personal injury or death.
The Garmin Tire Pressure Monitor System is available as a
separate accessory. The tire pressure feature is not compatible
with all zūmo models. Go to www.garmin.com/zumo for
accessory and compatibility information.
Setting Up the Tire Pressure Sensors
Before you can set up the tire pressure sensors, you must have
the battery and the numerical stickers included with
each sensor. You also must have a compatible zūmo device.
The sensors communicate wirelessly with your compatible
zūmo device. You can monitor tire pressure and receive low-
pressure alerts on your zūmo device.
1
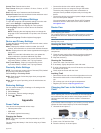
Remove the cap
À
from the sensor
Á
by rotating the cap
counter-clockwise.
2
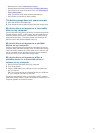
If you have already installed the battery in the sensor,
remove the battery.
3
On your zūmo device, select Apps > Tire Pressure.
4
Select a vehicle profile that matches the tire configuration of
your vehicle.
5
Bring the sensor close to the zūmo device.
6
On your zūmo device, select the number next to the tire to
which the sensor will be paired.
7
Within 30 seconds, on the sensor, insert the battery
Â
into
the battery holder
Ã
with the positive side facing up.
The zūmo device searches for the sensor and displays a
confirmation message when the sensor pairs successfully.
TIP: If the sensor does not pair successfully, you should
remove the sensor battery, and repeat steps 6 and 7.
8
Enter the recommended pressure for the tire.
9
Enter the minimum pressure for the tire.
The zūmo device triggers a low-pressure alert when the
sensor reports a tire pressure reading lower than this value.
10
Replace and fully tighten the cap on the sensor.
11
On the sensor, affix the numerical sticker that corresponds to
the tire number you selected in step 6.
12
Repeat this procedure for each remaining sensor.
Installing the Sensors on Your Tires
WARNING
The Tire Pressure Monitor System is for use with metal tire
valve stems only. Installation of the Tire Pressure Sensors on
non-metal tire valve stems may cause tire and/or tire valve stem
damage which could result in serious personal injury or death.
NOTICE
To prevent possible damage to the sensors or vehicle, ensure
each installed sensor does not interfere with the vehicle brakes,
suspension components, or other installed equipment. If an
12 Using the Apps