3
1.4 Mounting
1.4.1 Pole/Rail (Pipe) Mount
The nut assembly supplied has standard 1-14" UNS threads that can be screwed
to a standard marine antenna mount, extension pole, or rail-mount bracket. Before
beginning the installation, plan for securing the pole/rail bracket to the boat and
purchase locally all the necessary hardware. It may be helpful to fasten the
pole/rail bracket to the boat before proceeding.
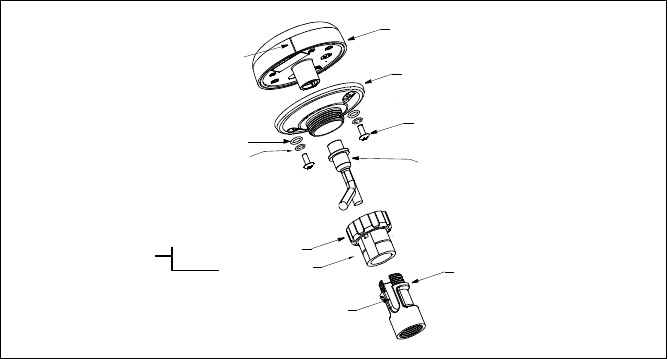
1. Unscrew the mount base (part C) from the surface bracket (part E). (The sur-
face bracket is not used in this installation. See the next page for part (E)).
2. Remove the label from the GPS receiver’s socket (underside of receiver). The
label may be discarded.
Fasten the mount base (part C) to the GPS receiver (part A) with the supplied
two panhead screws, flat washers and spring washers. The torque for the
screws is 1.35 N
Q
m.
3. Decide if you want the cable to exit through the center or along the side of the
pole/rail bracket. Slide the nut assembly (captive nut and adaptor) onto the
cable at the 9-pin GPS connector end. Do not connect the GPS receiver at this
time.
1) Center exit—Pass the instrument connector end of the cable down through
the center of the pole. Be sure to leave several inches of cable extending
beyond the nut assembly.
2) Side exit—Place the cable side-exit adaptor (part D) over the cable. Being
sure the cable is passing through the slot in the side, screw the nut assembly
onto the adaptor. Hand-tighten only. Do not over tighten.
Note: Use the adaptor supplied as it has smooth edges that will not chafe the
cable. Do not use a purchased part.
CAUTION: If you use a thread locker, use teflon pipe thread tape. Do not use a
liquid thread locker as it may weaken the plastic, causing it to swell and crack.
4. Screw the extension pole/rail bracket onto the nut assembly / cable side-exit
adaptor. Hand-tighten only. Do not over tighten.
GPS receiver (part A)
Mount base (part C)
Panhead screw (2 pcs.)
GPS connector
Cable side-exit
adaptor (part D)
Alignment tab
Captive nut
Slot for cable exit
1)
2)
Flat washer (2 pcs.)
Spring washer (2 pcs.)
Adaptor
Nut
Assembly


