5
7. Wrap pipe thread tape around the threads of the mount base two times to seal
it tightly to the surface bracket.
8. Coat the part of the GPS connector shown in the figure on page 4 with silicone
sealant. Pass the GPS connector end of the cable up through the hole in the
surface bracket.
9. Remove the protective cap from the cable’s GPS connector. (Save the cap to
protect the connector, when the receiver is removed.) Plug the cable firmly into
the GPS receiver.
10.Counterclockwise twist the cable three and one-half turns. Then screw the
GPS receiver onto the installed surface bracket. Hand-tighten only. Do not
over tighten.
1.4.3 Flush Mount
See the outline drawing for mounting hole
dimensions and fixing instructions.
1. Remove the label from over the GPS
receiver’s socket. (The label may be dis-
carded.) Apply removable thread locker
to the two studs supplied. Screw the
studs into the underside of the GPS
receiver (part A).
2. Using the gasket (part B) as a template,
position it at the selected mounting location upside down with the arrow facing
forward. Mark the position for the two mounting holes and the center hole for
the cable.
3. Using a 3mm or 1/8" bit, drill the pilot holes. Using a 6mm or 1/4" bit, drill the
two mounting holes for the studs. Drill the cable hole with a 38mm or 1-1/2" bit.
Fiberglass—Minimize surface cracking by running the drill in reverse until the
gelcoat is penetrated.
4. Pass the instrument connector-end of the cable through the center of the gas-
ket and down through the center mounting hole in the boat.
5. Plug the cable firmly into the GPS receiver.
6. Orient the gasket with the arrow facing in the same direction as the alignment
tab on the GPS receiver. Push the gasket onto the studs and slide it over the
connector.
Note: The gasket fits one way only. A groove in the gasket fits over the align-
ment tab on the connector.
7. With the GPS receiver alignment tab pointing forward, push the studs through
the mounting surface. Check to be sure the gasket is tucked under the lip of the
unit. From underneath the mounting surface, fasten the studs with the thumb
nuts. Hand-tighten only. Do not over tighten.
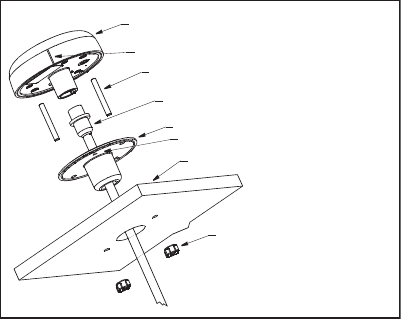
GPS receiver (part A)
Aligment tab
Stud (2 pcs.)
GPS connector
Gasket (part B)
Arrow
Mounting surface
Thumb nut (2 pcs.)


