


4
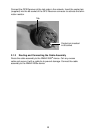
5. Remove the protective cap from the GPS connector on the cable. (Save the
cap to protect the connector, when the receiver is removed.) Plug the cable
firmly into the GPS receiver.
6. With the alignment tab on the GPS receiver facing forward, slide the captive nut
upward and screw it onto the mount base. Hand-tighten only. Do not over
tighten.
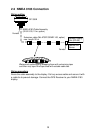
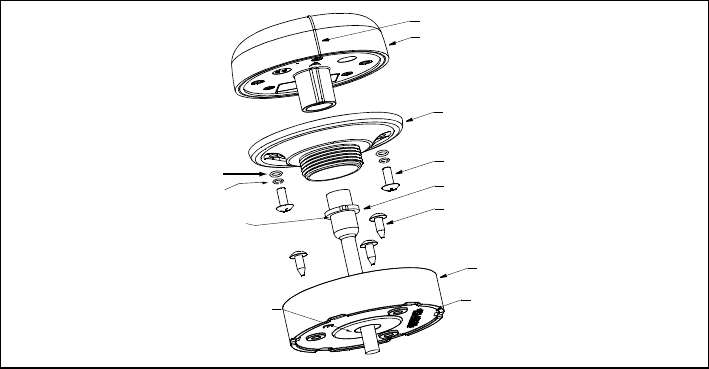
1.4.2 Deck Mount
See the outline drawing for mounting hole dimensions and fixing instructions.
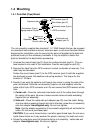
1. Unscrew the mount base (part C) from the surface bracket (part E) (see figure
above). Remove the label from over the GPS receiver’s socket. (The label may
be discarded.) Fasten the mount base (part C) to the GPS receiver (part A) with
the supplied panhead screws, flat washers and spring washers. The torque for
the screws is 1.35 N
Q
m.
2. Screw the surface bracket (part E) onto the mount base of the assembled GPS
receiver. Use a pencil to extend the alignment tab onto the surface bracket.
Unscrew the surface bracket.
3. At the selected location, position the surface bracket with the pencil mark facing
forward. Using it as a template, mark the position for the three mounting screws
and the center hole for the cable.
4. Using a 3 mm or 1/8" bit, drill the pilot holes. Using 5.1 mm or #7 bit, drill the
three mounting holes. Drill the cable hole with a 25 mm or 1" bit.
Fiberglass—Minimize surface cracking by running the drill in reverse until the
gelcoat is penetrated.
5. At the location shown in the figure above, coat the surface bracket (part E) with
silicone sealant.
6. Apply silicone sealant to the three #10 x 1/2" self-tapping screws to seal the
deck. With the pencil mark facing forward, fasten the surface bracket in place.
Do not block the drain slots. They will allow any water that accumulates inside
the surface bracket to escape. CAUTION: Do not use a liquid thread locker as it
may weaken the plastic, causing it to swell and crack.
Aligment tab
GPS receiver (part A)
Mount base (part C)
Panhead screw (2 pcs.)
GPS connector
Self-tapping screw (3 pcs.)
#10x1/2"
Surface bracket (part E)
Silicone sealant
Silicone sealant
Flat washer (2 pcs.)
Spring washer (2 pcs.)
Drain slot (6)