


W9257a-0720
16
Troubleshooting • Solución de problemas • Guide de dépannage Î service. sher-price.com
24
19
20
23
24
24
22
22
21
21
7
22
21
7
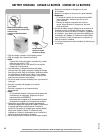
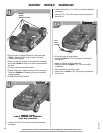
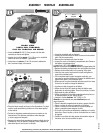
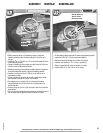
• Locate the simulated radio on the dash.
• Loosen two screws under the dash to remove the simulated
radio. Set the screws aside.
• Remove the simulated radio from the dash.
• Loosen the screw in the battery compartment door. Remove
the battery compartment door.
• Insert three “AA” (LR6) alkaline batteries.
Hint: We recommend using alkaline batteries for longer battery life.
• Replace the battery compartment door and tighten the screw.
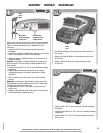
• Replace the simulated radio in the opening in the dash.
• Insert the two screws back under the dash and tighten to
secure the simulated radio.
• If this simulated radio begins to operate erratically, you
may need to reset the electronics. Remove the batteries and
replace them back in the simulated radio.
• When sounds from the simulated radio become faint or stop,
it’s time for an adult to change the batteries!
• Localizar el radio de juguete en el tablero.
• Afl ojar dos tornillos de la parte de abajo del tablero para
desprender el radio de juguete. Poner los tornillos a un lado.
• Desprender el radio del tablero.
• Afl ojar el tornillo de la tapa del compartimiento de pilas con
un desatornillador de cruz. Retirar la tapa.
• Introducir 3 pilas alcalinas “AA” (LR6) x 1,5V.
Atención: se recomienda usar pilas alcalinas para una
mayor duración.
• Cerrar la tapa del compartimiento de pilas y apretar el tornillo.
• Volver a montar el radio en la apertura en el tablero.
• Volver a insertar los dos tornillos en la parte de abajo del
tablero y apretarlos para asegurar el radio.
• Si el radio no funciona correctamente, restablecer el circuito
electrónico. Sacar las pilas y volver a introducirlas en el radio
de juguete.
• Cuando los sonidos del radio pierdan intensidad o dejen de
funcionar, es la hora de sustituir las pilas.
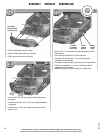
ASSEMBLY MONTAJE ASSEMBLAGE
1,5V x 3
"AA" (LR6)
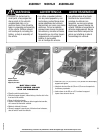
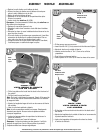
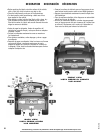
• Insert two black #8 x ¾" (1,9 cm) screws into the dash
assembly as shown and tighten.
• Insertar dos tornillos negros n° 8 x 1,9 cm en la unidad del
tablero, tal como se muestra, y apretarlos.
• Insérer deux vis noires nº 8 de 1,9 cm dans le tableau de
bord, comme indiqué, et les serrer.
x2
x
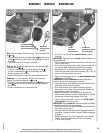
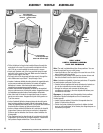
DASH VIEW
VISTA DEL TABLERO
VUE DU TABLEAU DE BORD
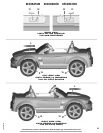
• Place the labels exactly as shown in the illustrations. For best
results, avoid repositioning a label once it has been applied
to the vehicle.
• Colocar las etiquetas exactamente como se muestra en las
ilustraciones. Para óptimos resultados, evitar despegar
y volver a pegar una etiqueta.
• Apposer les autocollants exactement comme indiqué dans les
illustrations. Pour de meilleurs résultats, éviter d’apposer un
autocollant plus d’une fois sur le véhicule.