


X3419pr-0920
10
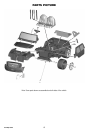
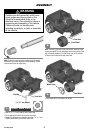
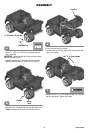
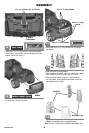
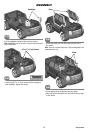
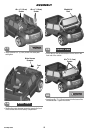
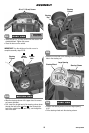
ASSEMBLY
1
/4
"
x 1
1
/4
"
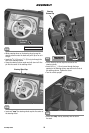
(0,6 cm x 3,1 cm) Screws
• Insert two
1
/4
"
x 1
1
/4
"
(0,6 cm x 3,1 cm) screws inside
of the battery compartment and into the front end of the
vehicle. Tighten the screws.
Battery
Compartment
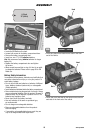
• Fit the bumper onto the front end.
TOP VIEW
RIGHT SIDE VIEW
Bumper
8
9
• Insert eight #8 x
3
/4
" (1,9 cm)
screws into the bumper
and tighten.
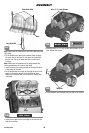
• "Snap" the headlights into the headlight lenses.
Hint: There is a left and right headlight and headlight lens.
• Apply the labels to the headlights.
• Before applying the labels, wipe the surface of the vehicle
with a clean, dry cloth to remove any dust or oils.
• Place the labels exactly as shown in the illustration.
• For best results, avoid repositioning a label once it has
been applied to the vehicle.
36 37
10
12
11
#8 x
3
/4
"
(1,9 cm) Screws
#8 x
3
/4
"
(1,9 cm) Screws
#8 x
3
/4
"
(1,9 cm)
Screws
Headlight
Headlinght Lens