


H7332pr-0920
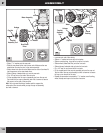
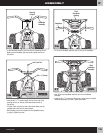
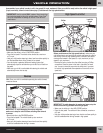
• Fit the handlebar assembly onto the end of the steering column.
Make sure the handlebar grip area points towards the rear of
the vehicle.
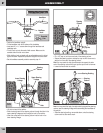
• Now, fit the back handlebar assembly to the front handlebar
assembly.
• Insert two #6 x
1
/2" screws into the two top, center holes in the back
handlebar assembly, as shown. Tighten the screws.
17
13
ASSEMBLY
F
H7332pr-0920
Steering
Column
Handlebar
Assembly
14
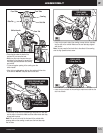
• Fit the front handlebar assembly into the front of the handlebar.
Handlebar
Front
Handlebar
Housing
16
Back
Handlebar
Assembly
15
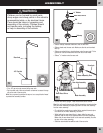
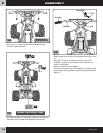
• Insert the #10 x
3
/4” screw through the hole in the end of the
steering column, so that the screw head faces the rear of
the vehicle.
• Fit the #10 lock nut onto the end of the screw. Make sure the
rounded side of the lock nut faces forward.
• While holding the lock nut steady with an adjustable wrench
(or pliers), tighten the screw.
#10 Lock Nut
Rounded
Side
#10 x
3
/4" Screw