


16
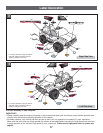
Label Decoration
G
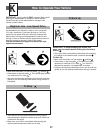
Proper label application will help to keep the labels
looking their best! When applying labels, keep the
following guidelines in mind:
•Wash your hands before applying the labels.
• Before applying the labels, wipe the surface of the
vehicle with a clean, dry cloth to remove any dust or oils.
• Place the labels exactly as shown in the illustrations.
•For best results, avoid repositioning a label once it has
been applied to the vehicle.
• After applying a label, rub the label firmly with a
clean, dry cloth to make sure the label is adhered
to your vehicle. Start at the center of a label, and
smooth towards the outer edges to remove
air bubbles.
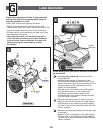
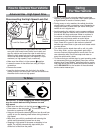
Windshield Label
Rear View
6
18
17
14
15
24
32
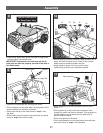
Follow these special instructions carefully to decorate
the windshield!
•Peel only the center strip off the back of the
windshield label.
• Note the three notches at the bottom of the
windshield label. Beginning with the notch in the
center of the label, align all three notches with the
raised markings on the vehicle body near the
bottom of the windshield.
• With the notch in the center of the label aligned
with the raised marking in the center of the
windshield, apply the center section of the
windshield label to the vehicle. Smooth the label
from the center, outwards.
• Remove the backing from one side of the label.
•Keep the notch at the bottom of the label aligned
with the mark on the vehicle body while applying
the label to the vehicle. Smooth the label from the
center, outwards.
• Remove the remaining backing from the other side
of the label.
•Keep the notch at the bottom of the label aligned
with the mark on the vehicle body while applying
the label to the vehicle. Smooth the label from the
center, outwards.
Notch
Notch
Raised
Markings
C A
A
B
C
B
Notch
1
2