


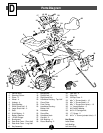


Assembly
F
Do not omit any steps. Please set aside at least
45 minutes for assembly.
4
10
2
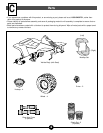
1
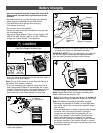
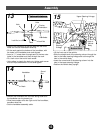
• Fit the cover plate over the opening in the front of the
vehicle body.
• Insert two #8 x
1
/2" screws (blunt silver) through the cover
plate and into the vehicle body.
Mudflap
Rear of
Vehicle
Body
Rear Fender
(Underside)
Cover Plate
Vehicle
Body
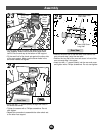
• Tip up the back end of the vehicle.
• Using safety scissors, remove the mudflaps from the
plastic connector. Dispose of the plastic connector.
• Align the holes in a mudflap with the screwpegs under
one of the rear fenders. Make sure the textured side of
the mudflap faces toward the seat.
• Insert four #8 x
1
/
2" screws (blunt silver) through the mud-
flap and into the screwpegs.
• Tighten the screws with a Phillips screwdriver. Do not
over-tighten.
• Repeat this procedure to assemble the other mudflap to
the other rear fender.
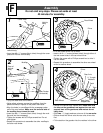
• Position the vehicle body upside down. Make sure that
the tabs on the gearboxes rest against the rear axle
support bars so the gearboxes and motors do not
hang down.
• Slide two
7
/16" (large) washers onto one of the rear axles.
• Slide a wheel with driver onto the rear axle, driver side
first.
• Fit the teeth on the gearbox into the notches in the driver.
7
/
16" (Large)
Washers
Tabs
Rear Axle
Support Bar
Rear Wheel
Rear Axle
Gearbox
Driver
Teeth
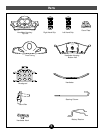
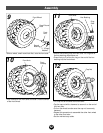
3
• Fit a rear wheel driver into a wheel.
• Insert a #10 x
1
/2" screw (pointed silver) through either of
the two screw holes in the rear wheel driver.
• Tighten the screw with a Phillips screwdriver to drive it
into the wheel.
• Repeat this procedure to assemble the other rear wheel
driver to another wheel.
Rear Wheel
Driver