


Assembly
14
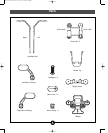
Axle
Bushing
Vehicle
Frame
Rear
Fork
Arm
Groove
Rear
Fork
Arm
Wheel (with
Hex Busings)
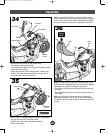
16
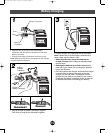
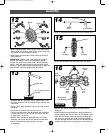
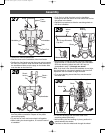
• Position the vehicle assembly so that the back is
facing you.
• While holding the hex bushings in place, position the
wheel between the rear fork arms of the vehicle frame.
• Slide the wheel axle (with axle bushing) through one
rear fork arm, through the wheel (with hex bushings)
and out through the other rear fork arm. Make sure the
wheel axle bushing fits into the groove in the fork arm.
Back View
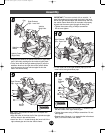
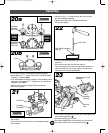
• Slide an axle bushing (flat side first) on the wheel axle.
15
Axle Bushing
Flat Side
Wheel
Axle
Wheel
Hex
Bushing
Hex
Bushing
14
• Fit two hex bushings into the center hole in a wheel.
12
Wheel
Guide
Guide
Guide
Guide
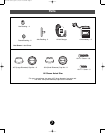
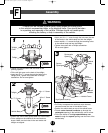
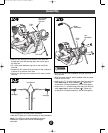
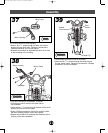
• Before applying labels to the wheels, wipe each wheel
with a clean, dry cloth to make sure it is free of dirt and
oils. Make sure your hands are clean.
• Apply labels to both sides of each wheel as shown in
the illustration.
IMPORTANT! Labels 1 and 2 are designed to slightly
overlap; and labels 3 and 4 are designed to slightly
overlap. For each wheel, apply label 1 before applying
label 2 . Align the edge of label 2 with the guide marks
on label 1. Apply label 3 before applying label 4. Align the
edge of label 4 with the guide marks on label 3.
2
2
1
3
1
4
3
4
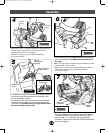
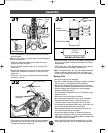
• Separate the fork axle from the two wheel axles. (The
fork axle is shorter than the wheels axles.) Set the fork
axle aside.
• Place a .437 (large diameter) cap nut on a flat surface,
inside up.
• Fit the end of a wheel axle into the cap nut.
• Tap the opposite end of the wheel axle with a hammer
to secure the cap nut on the axle. Pull on the cap nut
to make sure it is secure.
• Repeat this procedure to assemble one .437 (large
diameter) cap nut to one end of the other wheel axle.
• Set one of the wheel axles aside for use later
in assembly.
13
Wheel Axle
.437 (Large Diameter)
Cap Nut
74370a-0920.qrk 5/21/01 2:06 PM Page 14