1077 Actuator
Instruction Manual
Form 5605
March 2007
9
For a size 0-KE or 2-KE actuator, drive the
pin into the shaft (the pin length is less than the shaft
diameter). Remove the input shaft from the actuator
housing and drive the pin out of the shaft.
For a size 6-KE actuator, rotate the input
shaft so that the pin may be driven through the soft
plug (item not shown) on the back side of the
gearbox housing.
For a size 7-KE, 9-KE, or 10-KE:6 actuator,
there is sufficient clearance in the gearbox housing
to drive the pin through the shaft. Rotate the input
shaft so that the pin will emerge on the drive sleeve
gear side of the shaft and carefully drive the pin out
of the shaft.
5. Remove the input shaft and push the worm away
from the drive sleeve gear.
6. Carefully noting the position of the index marks
on the drive sleeve gear hub, remove the drive
sleeve gear.
7. Remove the worm gear along with any shims or
thrust bearings where used.
8. Inspect all parts for excessive wear.
Assembly
Note
Before or during assembly, coat the
following surfaces with a quality gear
lubricant:
D The teeth of the worm and the
drive sleeve gear, and
D The bearing surfaces of the
gearbox housing, worm and input
shaft.
1. Install the worm and any shims and thrust
bearings into the gearbox casing. Keep the worm at
the maximum possible distance from the installed
position of the drive sleeve gear.
2. Install the drive sleeve gear onto the splined
valve shaft. Be sure that the index marks are aligned
as they were prior to disassembly.
3. Noting the position of the pin holes and the
original position of all shims and thrust bearings,
install the actuator input shaft into the bore of the
worm.
4. Make sure that the pin holes are aligned and
install the worm pin. Be certain that the pin does not
protrude from either side of the worm and interfere
with the teeth on the drive sleeve gear.
For a size 6-KE actuator only, install the soft plug on
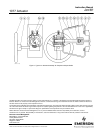
the back side of the gearbox (key 1) housing.
5. Install the gearbox cover plate.
6. For a size 0-KE actuator only, install the O-ring
grease seal onto the hub of the drive sleeve gear.
7. Install the travel indicator making certain that the
pointer indicates the same degree of rotation as was
noted prior to disassembly.
8. For a 10-KE:6 actuator only, install the reduction
drive onto the input shaft and secure with
capscrews.
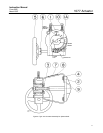
9. Install the handwheel (key 5) and pin (key 6).
10. If necessary, adjust the actuator by following the
instructions given in the Adjustment procedure.


