1077 Actuator
Instruction Manual
Form 5605
March 2007
2
Table 1. Specifications
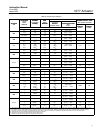
Actuator Sizes
See table 2
Acceptable Valve Shaft Diameters
See table 2
Output Torque
See table 2
Wheel-Rim Force
See table 2
Handwheel Turns Required for Full Rotation
See table 2
Handwheel Rotation
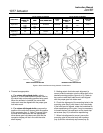
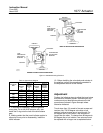
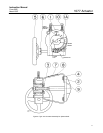
Direct Acting Construction: Clockwise
handwheel rotation closes the valve (produces
clockwise rotation of valve shaft) as shown in
figure 2.
Reverse Acting Construction: Clockwise
handwheel rotation closes the valve (produces
counterclockwise rotation of valve shaft) as
shown in figure 2.
Maximum Output Rotation
0 to 90 degrees.
Mounting Positions
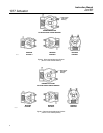
J Right-hand (actuator on right side of valve body
when viewed from the body inlet) or
J left-hand (actuator on left side of valve body
when viewed from the body inlet). Position 1 as
shown in figure 3 is standard; however, the
actuator may be mounted in any of the positions
shown in figure 3. Refer to figure 2 to determine
the correct actuator construction.
Approximate Weights
See table 3
Installation
The Type 1077 actuator is normally shipped
mounted on a control valve body. Follow the
procedures in the control valve body instruction
manual for valve installation. Then, proceed to the
Operation section of this manual.
If the actuator has been shipped separately for
installation on a valve body, or if the actuator was
removed for maintenance, mount the actuator by
following the instructions presented in this section
before installing the valve body in the pipeline.
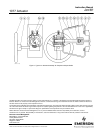
Individual part key numbers and part descriptions
referenced in this procedure are shown in figure 6
and 7 except where otherwise indicated.
CAUTION
Rotating the valve disc or ball in the
wrong direction will damage seals and
other internal parts in some valve
bodies. If the drive sleeve gear (key
1A) is not properly positioned,
improper disc or ball rotation could
result. If there is any doubt as to
whether or not the drive sleeve gear is
properly positioned, remove the
gearbox cover plate. Use the
appropriate view in figures 3, 4, and 5
to determine that the drive sleeve gear
is at the proper end of its rotation.
1. Rotate the valve disc or ball to the closed
position. Refer to the separate valve body instruction
manual to determine the closed position. Consult the
appropriate valve instruction manual Installation
section for valve shaft orientation marks.
2. Rotate the handwheel (key 5) to move the drive
sleeve gear to the position that is to correspond to
the closed position of the valve disc or ball as
follows:
For direct acting turn the handwheel so that the
drive sleeve gear and travel indicator are rotated
fully clockwise.
For reverse acting turn the handwheel so that the
drive sleeve gear and travel indicator are rotated
fully counterclockwise.
3. Remove the travel indicator pointer by removing
the machine screws. For a size 0-KE actuator only,
remove the O-ring seal from the hub of the drive
sleeve gear. Locate the four index marks on the
drive sleeve gear hub. Also locate the index mark on
the end of the valve shaft or stub shaft (key 13,
figure 7).


