


OPERATION AND SERVICE INFORMATION
Page 19
Owner’s Manual and Service Guide
Read all of manual to become thoroughly familiar with this vehicle. Pay particular attention to all Notes, Cautions and Warnings
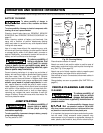
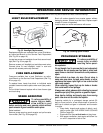
Fill engine to upper hole on dipstick with appropriate oil
(Ref. OIL CHANGE on page 18).
Return oil fill cap and dipstick and lower seat.
Start engine and check for leaks.
Shut engine off, check oil level and add, if necessary, to
bring level to upper hole on dipstick.
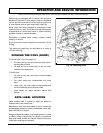
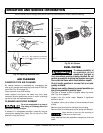
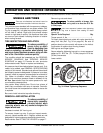
SPARK PLUGS
To reduce possibility of engine damage:
Only use recommended spark plugs.
Tighten spark plugs as instructed. Too loose can overheat
engine and too tight can damage threads in cylinder head.
Inspect and replace spark plugs at intervals indicated in
Periodic Service Schedule. See ‘PERIODIC SERVICE
SCHEDULE’ on page 15.
Remove plug wires and clean area around plugs to pre-
vent debris falling into cylinders. Use a 13/16” spark plug
wrench to remove plugs.
Inspect electrodes for wear and insulator for cracks or
chips. Fouled spark plugs are indicated by a wet, black
appearance. This could be caused by a dirty air filter ele-
ment or other restrictions in air intake system. Incorrectly
adjusted valves, spark plug wires which are in poor con-
dition or poor quality fuel could also contribute.
If reusing spark plugs, clean with wire brush.
Check gap. Gap should measure .028 - .031" (.70 - .80
mm). If necessary, adjust gap being careful not to dam-
age plug.
If replacing spark plugs, use only recommended type.
(Ref. Fig. 22 on page 16). New plugs must be properly
gapped before installation.
Install plugs by hand to reduce chance of cross-thread-
ing.
• When plug seats against engine:
• Tighten used plugs an additional 1/8 to 1/4 turn.
• Tighten new plugs an additional 1/2 turn.
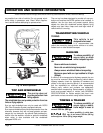
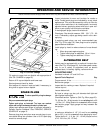
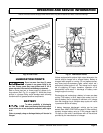
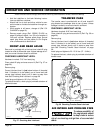
ALTERNATOR BELT
Vehicle may be equipped with an optional hi-output alter-
nator (Ref. Fig. 28 on page 20). It provides power neces-
sary to run a variety of equipment such as electric
powered tools, hi-intensity lighting, radio and winch.
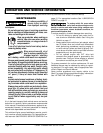
ADJUSTING BELT
Hardware involved: 1/2" and 9/16" hex
Special Tools Required Qty.
Torque wrench, ft. lbs. ................................................. 1
Belt tension gauge....................................................... 1
Inspect belt for cracking or wear. Replace if required.
Loosen top nut.
Loosen bottom bolt.
By hand or using a pry bar, pull alternator belt tight and
hand tighten bottom bolt.
Check belt tension. Tighten to (Ref. Fig. 28 on page 20):
75 - 80 lbs. (34 - 36 kg) tension for an existing belt or 90
- 110 lbs. (41 - 50 kg) tension for a new belt when using a
belt tension gauge. Apply gauge half way between the
two pulleys.
-or-
a maximum deflection of 1/2" (13 mm) for an existing
belt or 3/8" (1 cm) for a new belt when gauging by hand.
Tighten bolt to 9 - 11 ft. lbs. (12 - 15 Nm) torque and nut
to 18 - 20 ft. lbs. (25 - 27 Nm).
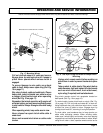
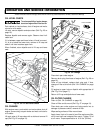
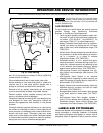
Fig. 27 Oil Filter Change
Ref Ofi 1
Front of Vehicle