


Nothing Comes Close to a Cobra
®
27
26
English
Settings
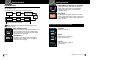
YourDetector
Auto Mute Mode
When Auto Mute is on, it automatically reduces the audio volume of all
alerts after they have sounded for four seconds. The signals will remain
muted for as long as the signal is detected. When Auto Mute is off, the
alerts will sound at full volume for as long as the signal is detected.
The factory setting for Auto Mute is On. Press MUTE/
to toggle
between Auto Mute vs. Manual Mute.
Voice or Tone Mode
Set detector to sound alerts and confirm program settings with a Voice or a
Tone. Voice Alert provides voice messages in addition to tones. Tone Alert
provides tones only. Factory setting is Voice Alert.
Remote Display Unit (RDU) Beep Level
RDU Beep sets the volume level for the keypad confirmation tones of the
RDU. Choose from Low, High or Off RDU beep level volumes.
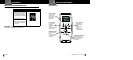
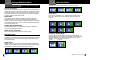
RDU Display Color
The RDU screen color theme is customizable to match your personal
preference or your vehicle’s dash illumination. Choices include Multi-Color,
Red, Blue, Orange or Green. Factory setting is Multi-Color.
Display Timeout
Display Timeout determines how long RDU button backlight and display stays
On before RDU screen switches to Auto Dark mode. Set RDU display time for
15 seconds, 30 seconds, one minute, three minutes or Always On. Factory
default is 30 seconds.
NOTE: If selecting “Always On” setting, RDU battery will need charging
more frequently.
Frequency Display Mode
Different Ka radar and LIDAR (Laser) guns operate at various frequencies
within their assigned spectrums. When Frequency Display is turned On,
the signal frequency will be added to the alert. The factory setting for
Frequency Display is Off.
Settings
Y
ourDetector
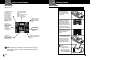
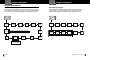
Set Activation Point
After the detector is installed in your vehicle and IntelliMute or IntelliMute Pro
is turned On using Menu mode, press the City
button to advance to the
IntelliMute Set Point screen where the Activation Point can be set.
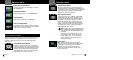
At the Set Point screen:
1. Press the Mute
button to advance to the Setup screen.
2. Press and hold the vehicle accelerator at the desired engine RPMs.
3. Press the Mute
button to complete the setting process.
The system will store the engine RPM setting and provide a completion
message on the display as well as a tone or voice message.
NOTE: If the unit is unable to sense usable pulses within three seconds
or if you do not set a rev point within 30 seconds of beginning the
setup, IntelliMute or IntelliMute Pro will indicate an error. If you do
not try again within five seconds, it will automatically turn Off. The
unit will provide corresponding messages for these conditions
.
Once an activation point has been set, you can easily change it by going
to IntelliMute / IntelliMute Pro in User Settings Menu and repeating the
three-step setup process.
If, for any reason, the unit stops sensing your engine’s revs, IntelliMute or
IntelliMute Pro will indicate an error and automatically turn Off.
CAUTION
Do not attempt to set the rev point while driving. Your vehicle should
be parked and idling to avoid a collision during the process.
NOTE: The rev point must be reset if you use your detector in a
different vehicle.
NOTE: When initially choosing your IntelliMute or IntelliMute Pro
Activation Point, a setting of approximately 300 to 600 RPMs above
idle is recommended.