


Remote controlled valet mode entry and exit
You can even enable or exit valet mode with your remote control simply by
transmitting channel 9 (LevelShift twice, then button 1). In addition to the above
indications, two parking light flashes will confirm that you have remotely enabled
valet mode, while a single flash confirms exiting of valet mode.
Remote controlled sensor adjustment
You may individually test and adjust the settings of each sensor zone:
1. Disarm the system with the remote control, open the driver’s window.
2. Turn the ignition to the “ON” position, enter your valet code, then press and hold the
momentary side of the switch until you hear a siren chirp.
3. Flick the switch to the latched position and back to center five times. Pause. You will
hear 5 chirps.
4. Tap the momentary side of the switch 5 times (you will hear a chirp each time).
5. Turn the ignition switch off, exit the vehicle, close the door, then select the zone you
wish to adjust:
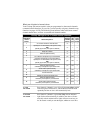
a. Interior zone: Transmit channel 11 (LevelShift twice, then button 3).
b. Exterior zone: Transmit channel 12 (LevelShift twice, then button 4).
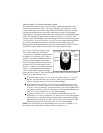
6. To test the current sensitivity setting:
a. Interior zone: Lean into the passenger compartment. You will hear a chirp when
the zone detects your presence. Ideally, it should chirp when you lean over the
driver’s seat, but remain silent when you lean toward the window.
b. Exterior zone: Lean toward the window. You’ll hear a chirp when the zone
detects you. Ideally, it should only chirp when you are within one foot of the window.
7. If you are not satisfied with the detection level and wish to increase sensitivity, press
button 2 on your remote control. To decrease it, press button 4. Each time you
increase sensitivity, the siren will sound higher and higher pitched chirps.
Conversely, sensitivity decreases are confirmed with lower and lower toned chirp.
Three chirps indicate minimum and maximum settings. There are 32 sensitivity
levels for the Proximity Sensor’s interior zone; 16 for the less critical warning zone.
8. Repeat steps 6 and 7 until you are satisfied with the sensitivity, then press button 1
to record the new sensitivity setting and exit the sensor test/adjust mode (you’ll hear
three chirps to confirm exit). You may now either repeat steps 1–4 for the other
sensor zone, or press button 1 again to arm the system.
Remote controlled override of one or both sensor zones
Transmitting channel 10 within 10 seconds of arming the system will override the
exterior warning zone of the Proximity Sensor (you’ll see 4 parking light flashes to
confirm the zone override). This is useful when parking in an area with heavy
pedestrian traffic. Transmitting channel 10 again within the 10 second period will
override both zones of the sensor for those times when you must leave a passenger
or pet in the vehicle. The sensor zones are automatically restored the next time you
arm the system.
12