


User-selectable features
Your Concept 50x allows you to set many of its features to your own personal
preferences. Although the system’s capabilities are extensive, we made the programming
procedures very simple: to make a change, you just flick the PlainView switch a few
times. Once you’ve changed a few settings, you’ll find that programming Concept
50x is so easy that you can even do it while driving! The system comes with all of its
features pre-programmed as noted by the bold type in the Table of user-selectable
features on pages 19-20. To change any of the settings, use the steps noted below.
To restore the feature to its factory setting, just repeat the procedure:
How to change a user-selectable feature:
Briefly, here’s how it will work:
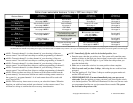
• Pick a feature from the Table on pages 19-20, noting its column and row numbers.
• First you’ll need to get into program mode by entering your secret valet mode
code (see page 10). After you have entered your code, press and hold the
momentary side of the PlainView switch until you hear a chirp. You’re now in the
“Feature Select” position.
• Next you’ll press the latched side of the switch a number of times identical to the
column number. Lastly, you will press the momentary side of the switch a number
of times corresponding to the row number.
That’s all there is to it! After you enter the feature’s column and row numbers,
you’ll hear either one chirp to indicate that the feature has been turned off, or two
chirps if turned on. It’s easy once you’ve done it. Try the examples on page 19.
Step-by-step programming instructions
1. Refer to the
Table of user-selectable features
and make note of the column (across)
number and the row (down) number of the feature(s) you wish to program.
2. Turn on the ignition, or start the engine (skip this step if the engine is running).
3. Enter your valet mode code (see page 10), then press the PlainView switch to its
momentary side for 3 seconds until you hear a siren chirp (the system LED will also
turn on to indicate program mode.) You are now in the
“Feature Select”
position.
4. Select the feature column: Toggle the switch in and out of the latched position the
same number of times as the column number of the selected feature (NOTE: each
latched-to-center motion is counted as one). Pause. You will hear the same number
of chirps as the column number you have selected, audibly confirming your selection.
5. Select the feature row: Press and release the momentary side the same number of
times as the feature’s row number. You’ll will hear a chirp each time you press.
6. If there is a
NOTE for the selected feature, perform the actions noted.
7. Pause. You will hear either one or two chirps: Two chirps = ON, one chirp = OFF.
8. You may select another feature, or you may exit program mode:
a. To select another feature in that column, repeat step 5 within the next 10 seconds
(after 10 seconds, 3 chirps mean you are now back in the “Feature Select” position).
b. To select a different feature column, go to step 4.
c. To exit program mode, turn the ignition off (you’ll hear 3 chirps and the LED will turn
off). If driving, just wait 60 seconds for the system to automatically exit program mode.
16