


CJ-981E 9
English
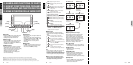
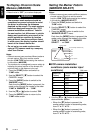
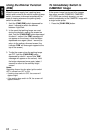
MARKER
SELECT
P7
MARKER
SELECT
P1
MARKER
SELECT
P3
MARKER
SELECT
P6
MARKER
SELECT
P2
MARKER
SELECT
P7
MARKER
SELECT
P1
MARKER
SELECT
P1
5. Press the [MODE] button to return to the
“CAM” mode screen.
Adjusting the Bumper
Position (MARKER ADJUST)
The display position of the scale markers set on
the screen can be adjusted to more closely
match the actual position of the vehicle’s
bumper.
Note:
• Different camera types are equipped with different
scale marker patterns. Be sure to set the “CAM
TYPE” first, and only then set the marker adjust.
1. Press the [FUNC] button and switch to the
“CAM” mode screen.
2. Press the [SELECT] (z) button and switch
to the CAMERA1 image.
3. Press the [MODE] button and switch to the
“MARKER ADJUST” setting menu.
Each time the [MODE] button is pressed the
menu alternates in the following order:
“CAM” ➜ “MARKER” ➜ … “MARKER
ADJUST” … ➜ “CAM”
4. Press the [z] and [w] buttons as required
to adjust the scale marker position up/down.
• The marker display position can be moved
10 steps above (V+1 to +10) and 10 steps
below (V-1 to -10) the default position. The
amount of perpendicular movement is
indicated on the screen.
• When the markers are moved from their
default position, the more the onscreen
markers move, the more they vary from
representing their actual physical position.
In such cases, it is safest to adjust the
bumper position marker a bit above the
actual position of the bumper as shown in
the screen.
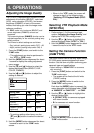
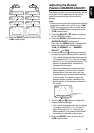
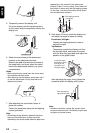
MARKER
ADJUST
P1
H+10
V -5
Bumper position
marker
Bumper ima
g
e
5. Use the [Å] and [Î] buttons to adjust the
marker positions left/right.
• The marker display position can be moved
10 steps to the left (H+1 to +10) and 10
steps to the right (H-1 to -10) from the
default position. The amount of horizontal
movement is indicated on the screen.
6. Press the [MODE] button to return to the
“CAM” mode screen.