


14 CJ-981E
English
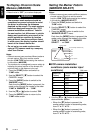
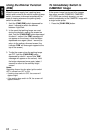
5. Temporarily remove the display unit.
Lift up the display unit while pressing down
on the unlock knob to temporarily remove the
display unit.
While pressing down
Lift up.
6. Attach the stand base to the determined
location on the attachment surface.
Remove the peel-off sheet from the base of
the stand base, and firmly attach the stand
base to the determined location (e.g. glove
compartment).
Notes:
• Before attaching the stand base, be sure to wipe
the attachment surface clean.
• After attaching the stand base, press down hard
so that the stand base is firmly attached to the
attachment surface.
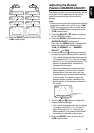
7. After attaching the stand base, fasten in
place with screws.
Fasten the stand base using the self-tapping
screws (provided).
Note:
• Sometimes strong adhesion between the stand
base and the attachment surface cannot be
obtained by the double-sided adhesive tape alone
depending on the material of the attachment
surface or heat. For extra safety, firmly fasten the
stand base in place using the self-tapping screws.
(In this case, note that screw holes will be drilled
into the attachment surface.)
Self-tapping screws
(provided)
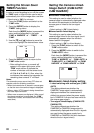
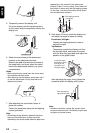
8. After about 24 hours, install the display unit
and adjust its angle for ease of viewing.
Front/back, left/right:
Loosen the angle adjustment screw to
adjust the angle.
Top/bottom:
Temporarily remove the display unit from
the monitor stand, and loosen the screw
with the Allen key (provided) and adjust the
position of the guide holder.
Loose the angle
adjustment screw,
and adjust the
front/back and
left/right angles.
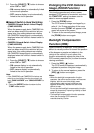
After adjusting the angle, firmly tighten the
screws to fasten the display unit in place.
After adjustment,
tighten and fasten.
Note:
• Vibration sometimes causes the monitor stand
screws to become loose. Periodically inspect and
re-tighten any loose screws.