


PIT BOSS
Users Manual
9
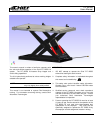
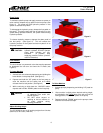
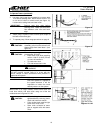
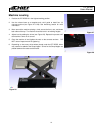
Shop-Hopper Tower
The Shop-Hopper tower is an optional accessory that allows
light pulls to be done with the Shop-Hopper. (See figure 14)
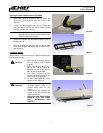
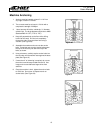
This tower mates to any of the 12 square holes around the
bottom of the Shop-Hopper. In order to properly use the
Shop-Hopper tower, the tower must be fully inserted into
one of the square holes. (See figure 15)
WARNING
To prevent personal injury and property damage. Always
fully engage the Shop-Hopper tower mount into the
Shop-Hopper before making any pulls.
While the Shop-Hopper is on the PIT BOSS it is permissible
to use one of the center square holes as a tower location.
Remove only one hold down clamp and insert the tower into
that location if needed.
WARNING
To prevent personal injury and property damage. Always
replace the hold down clamp removed when finished with
the pull.
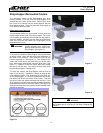
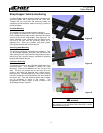
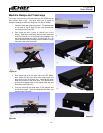
Once engaged into the Shop-Hopper, the tower may be
pivoted in the mount to achieve the desired pulling angle.
To do this, lift the spring loaded pull pin on the tower arm.
(See figure 16) Next, rotate the tower and fully engage the
pull pin into the desired location.
The Shop-Hopper tower is hydraulically powered by an air
over hydraulic pump similar to the PIT BOSS. The pump
must be connected to an air supply to function.
The vertical angle of the pull is controlled by adjusting the up
and down position of the tower collar on the tower pipe. The
horizontal angle of the pull is adjusted by tower placement
and the rotation of the tower collar on the tower pipe.
WARNING
To prevent personal injury and property damage. Never
lower the PIT BOSS below the normal ride height of
the Shop-Hopper Tower with the tower engaged into the
Shop-Hopper.
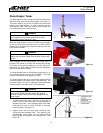
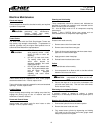
1. To adjust slack tower chain, grip chain on each side of
tower. Lift out on tail of chain until it is approximately 45
degrees from tower. Then disengage chain from tower
head and pull chain to either increase or decrease
amount of slack. (see figure 17)
2. Support collar with one hand while loosening collar
locking knob with opposite hand. Then position collar
approximately three inches (75 mm) above desired
pulling height and retighten collar locking knob. (see
figure 18)
Figure 14
Figure 15
Figure 16
Figure 17