


Mounting Guidelines
• Mount the unit as low as possible near the
c
enter of the windshield.
•
Do not mount the unit behind wipers,
ornaments, mirrored sunscreens, etc. These
o
bstructions have metal surfaces which can
a
ffect radar and laser signals and reduce
c
ritical warning time. (Regular tinted glass
d
oes not affect reception).
• Some windshields have an Instaclear
™
or
E
lectriclear
™
t
ype coating, which affect radar
s
ignals. Consult your dealer or the vehicle’s
owner’s manual to determine if your
windshield has this coating.
• Avoid placing the unit in direct contact with the
windshield.
• To reduce the possibility of theft, conceal the
unit when not in use.
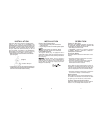
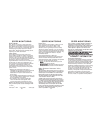
Windshield Mounting
• Install the two suction cups and rubber bumper
onto the bracket by fitting them into their holes.
• Press the suction cups onto the windshield at the
location you have chosen.
(Image A)
I
I
M
M
P
P
O
O
R
R
T
T
A
A
N
N
T
T
: Make sure the unit is level
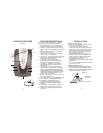
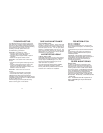
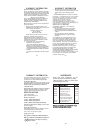
WHISTLER FEATURES
Whistler’s ergonomic and user-friendly design provides a new
level of operating convenience. Special features include:
1
. Bracket Release Button –
p
rovides quick
and easy release of the mounting bracket.
2. Speaker – provides distinct audio warnings
f
or X, K, Ka band radar, safety radar, laser and
VG-2.
3. M
ounting Bracket Location
– slot holds
mounting bracket firm
ly.
4
.
Radar Antenna –
compact, high-ef
ficiency
antenna receives radar signals.
5. Front Laser – high gain optical lens provides
increased sensitivity and field of view for
leading-edge laser detection.
6. Rear Laser – an integrated optical
waveguide provides superior detection of
laser signals transmitted from behind.
7. City Button - reduces the annoyance of
false alerts typically encountered in urban
driving areas.
8. Quiet Button - pressing QUIET before a
signal is detected engages Auto Quiet Mode
which automatically reduces the audio level after
the initial warning to a low audio level setting.
Pressing QUIET during a radar/laser encounter
silences audio alerts, while allowing visual
alerts to keep you informed.
9. Power / Volume Control – turns unit on/off
and adjusts audio level.
10. Dim / Dark Button - engages Dim/Dark modes.
11. Menu Button - enters Option Select Mode.
12. Text Display - provides distinct visual
confirmation of signals detected, signal
strength, and indicates engaged modes of
operation.
13. Low Profile Alert Periscopes - provide an
additional attention getting visual alert.
14. Power Jack - provides connection for the
power cord.
FEATURE DESCRIPTIONS INSTALLATION
Windshield
Mounting
2
3
4
XTR-430
4
5
3
1
2
6
8
10
9
11
7
1
3
12
14
(Image A)