


NOTE: BATTERY VOLTAGE button is disabled in Alternator Check mode.
ALTERNATOR VOLTAGE CHECK: will not work in normal charge mode it will only work in the stand-by mode when
the LED display is showing “000” or a circulating pattern.
PART 1: No Load (Turn OFF all vehicle’s accessories): The battery must be fully charged before testing the alternator. Run the
engine long enough to achieve normal idle speed and verify there is a no-load voltage.
1. PRESS and hold down Alternator Check for 5 seconds to start the check.
2. ALTERNATOR GOOD LED will light to indicate the alternator is good, or the FAULT CODE F07 will
be displayed to indicate the alternator is not good.
3. Press Alternator Check button again to stop the test.
PART 2: Under Load (Accessories ON): Next, load the alternator by turning on as many accessories as possi-
ble (except for A/C and DEFROST)
1. PRESS and hold down Alternator Check for 5 seconds to start the check.
2. ALTERNATOR GOOD LED will light to indicate the alternator is good, or the FAULT CODE F07 will
be displayed to indicate the alternator is not good.
3. Press Alternator Check button again to stop the test.
If the first alternator check indicates a good alternator and the second indicates the alternator is bad, the problem could stem
from: loose fan belts, an intermittent diode failure or possibly bad connections between the battery and alternator and/or ground.
11. Push the Equalize button anytime and the battery will automatically begin to equalize but in 2 Amp limited current. In
order to push the recessed button you will need a small pin or ballpoint pen .
12. Every hour the temperature should be checked by touching the battery .If the battery is to hot to touch stop the charg
ing and let the battery cool.
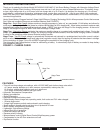
13. The voltage rises but does not go over 15.3v to 16.2v (2.55 - 2.7v per cell) depending on ambient temperature ,it will
automatically adjust.
14. The “wet” LED flashes while the charger is in the equalize mode.
15. The digital readout will show “FUL” when the equalization process is complete.
16. The equalization process may take anywhere from 2 to 6 hours to complete.
NOTE: If someone has added a number of accessory loads on the charging system, thereby increasing current
demand from the alternator. MAKE SURE THAT THE ALTERNATOR IS RATED TO THE APPLICATION.
NOTE: This check may not be accurate for every make, manufacturer and model of vehicle. There is wide variation in
user-controlled electrical loads, alternator output and wiring. Other factors include battery condition, tempera-
ture, and engine idle speed. It is recommended to check your alternator when it is known to be operating prop-
erly to verify that this check is valid for your particular vehicle.
Check only 12V systems. Checking 24 or 36V systems will damage charger.
9