Crankshaft, piston and connecting rod
113
Reassembly
1. Install the governor shaft.
NOTE: The governor shaft MUST be installed before the crankshaft is installed.
2. Clean the cylinder
2a. Remove all gasket material from all mating surfaces.
2b. Clean the cylinder and crank case cover.
3. Oil seals
3a. Install a new oil seal in the cylinder block.
3b. Install a new seal in the crank case cover.
4. Insert the crankshaft and bearing into the cylinder block.
NOTE: Pre-lube the crankshaft with clean 10W-30 motor oil.
NOTE: Use an old piece of microfiche or a seal protector to protect the oil seal lip while inserting the crank
shaft.
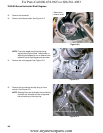
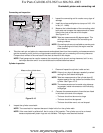
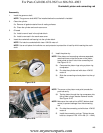
5. Install the piston by:
NOTE: If the piston and connecting rod were separated,
reconnect them so that the arrow on the piston
head points to the oil hole in the connecting rod.
See Figure 10.19.
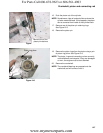
5a. Compress the piston rings using a piston ring
compressor.
5b. Pre-lube the cylinder wall with clean 10W-30
motor oil
5c. Slide the connecting rod and piston into the cyl-
inder.
NOTE: The arrow on the piston must point towards the
push rod cavity.
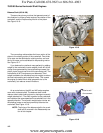
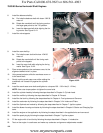
5d. Tap the piston through the ring compressor into
the cylinder using a wooden hammer handle.
See Figure 10.20.
NOTE: Make sure the crank pin is at BDC (bottom dead
center) to prevent damage from the connecting
rod.
5e. Pre-lube the connecting rod with clean 10W-30
motor oil
5f. Install the connecting rod cap. Tighten the cap
bolts to a torque of 106 -124 in-lbs (12 - 14Nm).
Figure 10.19
Oil hole
Arrow
Figure 10.20
Tap piston with
hammer handle
For Parts Call 606-678-9623 or 606-561-4983
www.mymowerparts.com


