


24
•
TR AX X AS
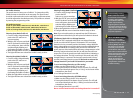
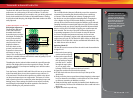
3. Place the high speed pinion gear onto
the motor shaft. Align the set screw hole
with the at side of the shaft.
4. Thread the supplied 1.5mm set screw
into the high speed pinion gear but do
not tighten it yet.
5. Slide the pinion gear down the motor
shaft so the wrench shaft ts into the
notch in the motor mount, as shown.
Tighten the set screw.
To complete the installation, reinstall the motor and set the gear
mesh as described to the right. Make certain the pinion does not
contact the motor mount or motor plate.
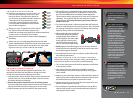
50+mph Battery Installation Instructions
1. Install the supplied battery as described on page 13.
2. Install an identical Power Cell Series 1 battery (#2925) sold
separately) in the opposite battery compartment.
3. Plug both batteries into the Y-harness (sold separately). The harness
connects the two packs in series. The two 7.2-volt 6-cell battery
packs will operate as one 14.4-volt 12-cell battery pack.
4. Plug the Y-harness into the speed control.
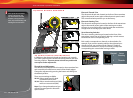
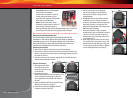
Motor Installation
To access the motor,
remove the gear
cover by removing
the single screw on
the top of the gear
cover. The motor
uses an aluminum
mount for quick,
easy motor access and gearing adjustment.
To remove the motor, rst open the right
battery door and slide out the ESC. Next,
remove the single large hex screw using
the supplied 2.5mm wrench. Then rotate
the motor and mount to the side of the
model, and slide backward off the post.
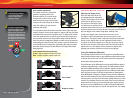
The motor mount was carefully
engineered to provide additional
features and adjustability. Two sets of
holes are provided for use with brushed
and brushless motors. The holes for brushed motors are spaced
16mm apart and accept 2.5mm screws. The holes for brushless
motors are spaced 19mm apart and accept 3mm screws.
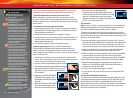
Adjusting Gear Mesh
Incorrect gear mesh is the most common
cause of stripped spur gears. Gear mesh
should be checked and adjusted anytime a
gear is replaced. Access the gears by removing
the single screw on the top gear cover.
To set the gear mesh, cut a narrow strip of
notebook paper and run it into the gear mesh
of the motor. The motor is mounted to an
aluminum motor mount. Loosen the single
motor mount screw with the provided 2.5mm
wrench to slide the motor mount. Slide the
motor and pinion gear into the spur gear.
Retighten the motor mount screw and then
remove the strip of paper. You should be able
to run a fresh strip of paper through the gears
without binding them.
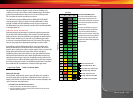
Motor Mount
Screw
Do Not Loosen
Brushed Motors
Brushless Motors
TUNING ADJUSTMENTS
Motor Mount Positions
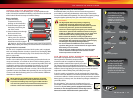
Precautions
• Make certain both batteries are fully charged before
installing them in your model. Installing a fully charged pack
and a partially discharged pack may lead to overdischarging
and damage to the partially discharged battery.
• Do not mix batteries of different brands, chemistries or
capacities. Only genuine Traxxas batteries are approved for
dual-battery use in this model.
• The high speed dual-battery and gearing conguration
is for high-speed running on smooth surfaces only. Avoid
repetitive hard acceleration to prevent overstressing the
motor, speed control and batteries. Stop running your
model and allow it to cool if the speed control’s thermal
overload protection activates or if the motor temperature
exceeds 200° F. Failure to install the appropriate gearing can
cause failure of the motor, speed control and batteries when
running the model on 12 NiMH cells.