


12
•
TR AX X AS
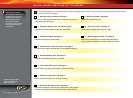
THE TRAXXAS TQ RADIO SYSTEM
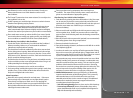
If the power indicator
doesn’t light red, check the
polarity of the batteries.
Check rechargeable
batteries for a full charge.
Spray a little window cleaner
on the antenna wire to make
it easier to push through the
antenna tube.
Don’t shorten the length of
the antenna wire. Its length
is tuned to the frequency
band; cutting it could
severely shorten the radio
system’s range.
If there are any kinks in the
black antenna wire, it will
be more difcult to push
through the antenna tube.
Pull the wire straight by
sandwiching it between your
thumb and index nger and
running your ngers along
the length of the wire (with
medium pressure).
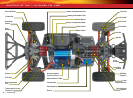
See page 20 for more
information about the
receiver box and maintaining
a watertight seal.
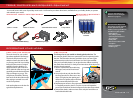
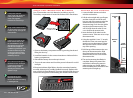
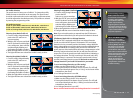
INSTALLING TRANSMITTER BATTERIES
Your TQ transmitter uses 8 AA batteries (see sidebar, page 10).
The battery compartment is located in the base of the transmitter.
1. Remove the battery compartment door by pressing the tab and
lifting the door up.
2. Install the batteries in the correct orientation as indicated in the
battery compartment.
3. Reinstall the battery door and snap it closed.
4. Turn on the transmitter and check the power indicator for a solid
red light.
If the power indicator light ashes, then the transmitter batteries
are weak, discharged or possibly installed incorrectly. Replace with
new or freshly charged batteries. The power indicator light does not
indicate the charge level of the battery pack installed in the model.
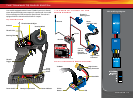
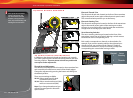
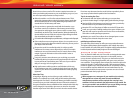
SETTING UP THE ANTENNA
1. Locate the black antenna wire that
exits the receiver box.
2. Pull the wire straight with your ngers
and then insert the end of the wire
into one end of the antenna tube (the
antenna tube can be found in the
documents bag). Push the wire all the
way through the antenna tube. The
wire is longer than the tube. Do not
cut or shorten the antenna wire.
3. Insert the base of the tube into the
antenna mount. Take care not to crimp
the antenna wire.
4. Using the supplied 1.5mm “L” wrench,
thread the 1.5mm set screw into the
opening next to the antenna. Tighten
the set screw until it is ush with the
top of the opening.
5. Fold the top of the antenna wire over
the top of the antenna tube. Slide
the antenna tip onto the top of the
antenna tube. Do not cut or shorten
the antenna wire.
6. The receiver antenna installation is
complete. Always fully extend the
transmitter’s telescoping antenna
when running your model. Make a
habit of holding the transmitter so the
antenna points straight up.
Antenna
Tip
Antenna
Tube
1.5mm
Wrench
Set
Screw
Antenna
Mount
3, 4