


Questions? Call our Tech Line 1-330-630-0240
sure that the work area is well ventilated and free
from sources of ignition (cigarettes, fire, sparks,
etc.). Cut the fuel filler hose approximately half
way between the fuel tank and the filler neck.
Remove the clamp that attaches the vent hose to
the filler neck. Remove the vent hose from the
filler neck. Slide one #28 hose clamp over each
piece of the filler hose (top and bottom). Install
the fuel filler extension between the two pieces of
the filler hose. Make sure that the filler neck will
reconnect to the body. Adjust the hose as
necessary. Tighten the hose clamps securely
over the filler extension. Cut the vent hose into
two pieces in the middle of the hose. Reconnect
the upper part of the hose to the nipple on the
filler neck. Slide one #10 hose clamp over each
piece of the hose. Insert the vent hose extension
between the two pieces of the vent hose. Adjust
the vent hose. Tighten the hose clamp securely.
NOTE: some models are equipped with a larger
diameter vent hose. This hose can be adjusted
and reconnected without using the extension.
Reconnect the filler neck to the body. Install the
stock mounting screws. Tighten the screws
securely. Reinstall the filler cap.
35. Using the stock hardware, mount the "L"
shaped ground strap brackets to each side of the
frame rail where the body-to-frame ground straps
were originally mounted. Mount the ground strap
to the bracket using a 1/4" x 1" bolt, two 1/4'”
washers and a 1/4” Nylock nut. Tighten the
mounting hardware securely. Be sure to
complete this procedure for both sides of the
vehicle.
36. Reinstall the front bumper. If you wish to
reinstall the two hooks, the bumper will be
reinstalled in the stock position. Note: if the
vehicle is equipped with fog lights, refer to the
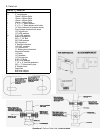
template for trimming the frame mount for
clearance. Lay the template on the outside
bumper frame mount. Align the hole and outside
edge of the template with the hole and the
outside edge of the frame mount. Mark the frame
mount at the dotted line on the template. Cut the
outside bracket according to the template. This
will allow clearance for the fog lights. The bottom
of the stock bumper bracket will need to be
trimmed to clear the bottom of the frame horn.
Refer to the diagram for trimming. Remove the
stock bumper brackets from the bumper. Trim
the bracket according to the diagram. Remount
the stock bumper brackets to the bumper.
Tighten all stock mounting hardware securely.
Mount the bumper raising brackets to the bumper
using the stock nuts. The studs on the new
brackets should be pointing away from the
bumper. Do not tighten. Install the bumper on the
vehicle with the studs going through the original
mounting holes. Install a 1/2" USS washer and 1/
2" Nylock nut on each stud. Do not tighten
completely. Adjust the bumper from side to side
and up and down. Tighten all front bumper
mounting hardware securely. We recommend the
use of Loctite® or similar adhesive on all mounting
hardware.
37. WARNING: THE REAR BUMPER
BRACKETS PROVIDED IN THIS KIT ARE
INTENDED TO ENHANCE THE APPEARANCE
OF THE VEHICLE ONLY. THEY ARE NOT
RATED FOR TOWING. ANY ATTEMPT TO TOW
WITH THE REAR BUMPER AFTER THESE
BRACKETS HAVE BEEN INSTALLED COULD
RESULT IN DAMAGE TO THE VEHICLE AND
SERIOUS PERSONAL INJURY. Remove the
stock rear bumper brackets from the bumper (the
outside supports will remain on the bumper).
Using the stock hardware, mount the new rear
bumper brackets to the bumper (the notch in the
bumper bracket goes down.) Do not tighten.
Mount the outside support brackets to the center
hole (between the bends) of the new brackets.
Note: some models have the outside supports
welded to the center area of the bumper. It will
not be possible to mount the outside supports to
the new brackets on these models. Hold the
bumper assembly in the position that it needs to
be mounted. Using the brackets as a template
mark the frame through the holes in the new
bumper brackets. Remove the bumper from the
vehicle. Drill a 1/2" hole in each location (there
should be two holes in each frame rail). Note: on
vehicles equipped with the rear tow hook, an
additional hole will need to be drilled in the new
bumper bracket corresponding to the bolts for the
tow hook. Align the holes in the right bumper
bracket with the holes in the frame for the tow
hook. Mark the bumper bracket through the third
hole in the frame. Make sure that the mark lines
up with the bolt pattern for the tow hook. Drill a 1/