


Questions? Call our Tech Line 1-330-630-0240
the driver's seat. The wire loom will be remounted
after the lifting operation is complete.
11. Loosen the clamp that mounts the air intake
hose to the intake manifold. Disconnect any wires
or other hoses connected to the main intake
hose. Remove the hose from the air cleaner
housing by releasing the large clamp that holds
the assembly together. Remove the hose from
the vehicle.
12. Remove the two bolts that mount the top of
the radiator to the core support. Carefully lift the
radiator up and off of the lower mounting pads.
Reposition the radiator under the lower mounting
pads. The radiator will be mounted to new
brackets under the stock pads. Remove the
rubber from the lower mounts.
13. Remove the brake lines from the plastic clips
on the driver's side fender well and frame rail.
The brake lines will need to be carefully bent to
gain slack. Gently bend the lines so they can flex
while lifting. Be extremely gentle with the lines;
they could easily be damaged if they are not
bent properly.
14. There is a sheet metal cover on the inside of
the driver's side frame rail that covers the lines
running to the fender well area (if equipped).
Remove the screws that mount the cover to the
frame. Remove the cover from the vehicle. The
larger diameter line (the top line) needs to be
removed from the forward mount bracket, and
bent to gain slack. Remove the bolt that closes
the mounting bracket over the lines. Remove the
top portion of the bracket. Reinstall the top
portion of the bracket and install the mounting
bolt. Tighten the mounting bolt securely. Carefully
and gently bend the line upward. Check the line
again while lifting the truck. Bend the line as
necessary to gain the proper amount of slack. Be
especially careful not to damage the line or
anything attached to the line.
15. Important: while working with the vehicle
steering do not allow the steerinq wheel to
turn independently from the steering gear. If
the steering is not reassembled in the exact
position that it currently is in, the air bag
system could malfunction. If this occurs the
repair will be quite costly. Mark the upper and
lower sections of the steering shaft where they
are connected at the firewall. This will ensure
proper connection after the steering extension
has been installed. Remove the bolt that
connects the upper steering shaft in the engine
compartment. Slide the lower steering shaft down
and off of the upper shaft. Install the female end
of the steering extension over the upper steering
shaft. Install a 3/8" x 1 1/2" bolt with a 3/8"
washer through the steering extension, the
steering shaft, and the opposite side of the
steering extension. Install a 3/8" washer and 3/8”
Nylock nut on the bolt. Tighten securely. We
recommend the use off Loctite® or similar
adhesive on all steering hardware. Connect the
lower steering shaft to the steering extension.
Realign the marks on the upper and lower
steering shafts. Insert the male end of the
steering extension into the lower steering shaft.
Insert the stock bolt through the lower steering
shaft, the steering extension, and threading into
the stock nut. Tighten securely. We recommend
the use of Loctite® or similar adhesive on all
steering hardware.
16. Remove the front bumper from the vehicle. If
the vehicle is equipped with fog lights under the
front bumper, disconnect the wiring from the
connector going to the fog lights. If the vehicle is
equipped with tow hooks, remove the three bolts
that mount each tow hook to the frame cross
member behind the bumper. The tow hooks will
not be reused. Remove the four nuts (two on
each side) that mount the front bumper to the
frame. Remove the front bumper from the
vehicle.
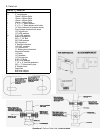
17. Measure the distance between the cab and
the bed. Record these measurements for proper
alignment after the lifting operation is complete.
Loosen, but do not remove all six cab-mounting
bolts. They are located as follows (one on each
side): at the front of the vehicle on each side of
the radiator; in the front floorboard; and behind
the front seat at the rear of the cab.
18. Remove the cab bolts from the passenger’s
side of the vehicle only. Be sure that the doors
are closed. This will help prevent the cab from
flexing during the lifting operation. Using a