


1
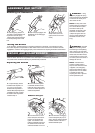
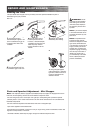
Press the spring buttons on
each side of the handlebars and
tap the bars until the spring
buttons slide inside and engage
the corresponding holes in the
fork.
2
When correctly engaged, the
handlebars will not disengage
from the fork.
3
T
ighten all four pinch
clamp screws (two in the
upper and two in the lower
crown).
Attaching the Handleba
rs
4
WARNING:
Failing
to properly engage the spring
buttons that affi x the handlebars
to the forks can cause you to
lose control and fall.
Note:
You may wish to ask
another person for assistance,
as it can be diffi cult to press
both buttons and tap the
handlebar into the fork at the
same time. A rubber mallet
is helpful to tap the bars into
place, as the fi t between the
handlebar and fork can be
snug.
REPAIR AND MAINTENANCE
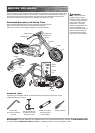
ASSEMBLY AND SET-UP
Check the Razor web site for any updates on the latest
repair and
maintenance procedures.
Turn power switch off before conducting any maintenance procedures.
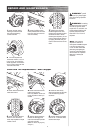
Adjusting the B
rakes
Mini Chopper
1
To adjust the play, thread
the brake lever adjuster in or
out 1/4 to 1/2 turn until the
desired brake adjustment is
attained. Most adjustments are
complete at this step. If brake
still needs further adjustment,
proceed to step 2.
2
If the brake lever adjuster
is threaded outward and the
brake still has too much slack,
use the rear brake adjuster for
additional adjustment.
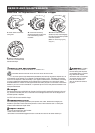
WARNING:
The brake
is capable of skidding the tire
and throwing an unsuspecting
rider. Practice in an open area
free from obstacles until you are
familiar with the brake function.
Avoid skidding to a stop as this
can cause you to lose control or
damage the rear tire.
Note:
The brake lever
contains a safety switch to
stop the motor when the brake
is applied. In an emergency,
applying the brake will always
stop the motor. Do not disable
or replace this lever with
anything other than a genuine
Razor replacement part.
2
If the brake has too much
slack, loosen the rear anchor
bolt and pull the brake wire
tighter.
The distance of the
brake wire
between the end of
the cable and the anchor bolt
should be between 37-44 mm.
37-44
mm
Rebell
ion
Chopper
3
If the brake rotor is dragging
on the brake pads use your fi n-
gers to twist the calliper adjuster
in either direction until rotor is
centered between pads
.
Testing the B
rakes
To use the brake, squeeze the lever to increase the pressure on the brake. The brake lever is fi tted
with a cable adjuster to compensate for cable stretch and/or to fi ne-tune the lever movement to brake
engagement. If brake is not engaging properly, follow instructions for adjusting the brakes outlined below.