


6
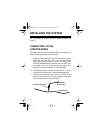
CONNECTING TO POWER
1. Touch the negative lead from a 12-volt test light or DC
voltmeter to a metal part of your vehicle and use the pos-
itive lead (with a wire-piercing probe adapter) to probe
for an existing wire that has 12 volts when your vehicle’s
ignition is off.
2. Use one of the supplied wire tap-ins to connect the sys-
tem’s red wire to the wire you located in Step 1, then
replace the fuse.
3. Connect the system’s black wire to a metal vehicle part,
using an existing bolt or screw.
4. Plug the power harness’ three-pin connector into the
system with the antenna lead to the left (see “Wiring Dia-
gram” on Page 11).
5. Immediately press
DISARM
on the remote transmitter.
This trains the system to recognize the remote.
INSTALLING THE STATUS INDICATOR
Select a highly visible location for the indicator. You can use
the supplied bracket to stick the indicator on your dashboard
or drill a hole in the dash’s front panel and insert the indicator.
Follow these steps to install it.
1. Plug the indicator’s two-wire connector into the two-wire
jack on the system.
49-851.fm Page 6 Thursday, August 19, 1999 10:56 AM