


8 Pelco Manual C1925M (3/99)
LENS MOUNTING
Do not release the back-focus locking ring unnecessarily. Back-focus adjustment has
been set at the factory to the standard CS-mount back-focus distance.
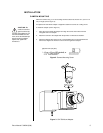
To mount a lens:
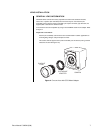
1. Remove the black protection cover from the CS-mounting ring.
2. If using a C-mount lens, mount a C/CS-mount adapter between lens and camera.
Refer to Figure 4.
3. Screw the lens on the camera. Be careful to prevent dust from entering the space
between the lens and the CCD element. If necessary, use clean, compressed air to
remove any foreign matter.
4. When using a passive (DC controlled) auto-iris lens, connect the iris cable to the iris
connector on the back of the camera. Refer to the
Auto-Iris Lenses
section.
5. Aim the camera and focus the lens to the object or area to be observed.
6. If a manual-iris lens is used, adjust the iris for the best picture quality. The largest
aperture gives the best light sensitivity, the smallest aperture the greatest depth of
field.
AUTO-IRIS LENSES
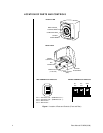
Passive auto-iris lenses are DC controlled via the 4-pin iris drive connector (type D4-152N)
located on the back of the camera (refer to Figure 1). When an auto-iris lens is used the
electronic shutter speed is fixed at 1/60th of a second for EIA-standard cameras or 1/50th
of a second for CCIR-standard cameras. The electronic shutter speed feature does not
apply to the CCC4001-2 model since this function has been disabled.
Pin connections for the iris drive connector are as follows (refer to Figure 1):
pin 1 control coil + (damping coil -)
pin 2 control coil - (damping coil +)
pin 3 drive coil +
pin 4 drive coil -
BACK-FOCUS ADJUSTMENT
Do not release the back-focus locking ring unnecessarily. Back-focus adjustment has
been set at the factory to the standard CS-mount back-focus distance.
Back-focus is defined as the distance between the lens optics and the camera’s CCD
sensing element.
Accurate back-focus becomes most critical when tracking stationary objects with a
motorized zoom lens. In rare cases, however, a camera that gives an unsharp picture using
a particular lens may require back-focus adjustment.
Fixed Focal Length Lenses
1. With the camera operating, position the camera to view the intended object.
2. Set the focus ring, if present, to infinity (∞).
3. Set the lens iris to its widest usable opening. Use a neutral density filter with auto-iris
lenses in outdoor or bright light settings to ensure maximum iris opening during back-
focus adjustment. When a neutral density filter is not available, point the camera to a
relatively dark area to obtain the greatest iris opening.
4. Adjust the back-focus.
a. Turn the back-focus locking ring counterclockwise to loosen the CS-mount ring.
NOTE:
The iris cable of a
(passive) auto-iris lens pre-
vents the lens being rotated
more than 180 degrees. In
this case, disconnect the iris
cable, rotate the lens a full
turn, reconnect the iris cable
and continue the adjust-
ment.
NOTE:
When adjusting
back-focus with an auto-iris
lens, the iris cable must be
plugged into the iris drive
connector; otherwise, the
iris will not open.