


4
EN
12
13
10
11
7
9
SET UP REMOTE RAIN GAUGE
The rain gauge collects rain and takes readings of the total rainfall over a period of
time. The sensor can remotely transmit data to the base station.
The base station and rain gauge should be positioned within effective range: about
100 meters (328 feet) in an open area.
The rain gauge should be mounted horizontally about 1 meter (2-3 feet) from the
ground in an open area away from trees or other obstructions to allow rain to fall
naturally for an accurate reading.
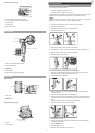
To set up the sensor:
1.
Remove screws and
slide the cover up and insert the batteries (2 x UM-3 / AA),
matching the polarity (+ / -).
Press RESET after each battery change.
RESET
2. Remove t
he tape.
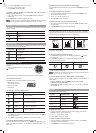
3. Put a
few drops of water on the cross at the base of the funnel to check the
horizontal level.
Water will pool to the center of the cross when the rain gauge is
level.
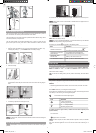
1
2
3
4
If wa
ter remains on 1-4, the gauge is not horizontal.
4. If ne
cessary, adjust the level using the screw.
NOTE
For best results, ensure the base is horizontal to allow maximum drainage of
any collected rain.
SET UP BASE STATION
NOTE
Install batteries in the remote sensor before the base station matching the
polarities (+ and -).
For c
ontinuous use, please install the AC adapter. The batteries are for back-up use
only.
NOTE
Please make sure the socket-outlet is installed near the equipment and is
easily accessible.
Install the base station batteries (4 x UM-3 / AA) matching the polarity + and -. Press
RESET
after each battery change.
NOTE
Do not use rechargeable batteries. It is recommended that you use alkaline
batteries with this product for longer performance.
The battery icon
indicator may
appear in the following areas:
ARE
A
MEANIN
G
Weather Forecast Area
Battery in the base station is low.
will
show when AC adapter is disconnected.
Temperature / Heat Index /
Wind Chill Area
The
disp
layed channel indicates the
outdoor sensor for which battery is low.
W
i
n
d
Sp
eed
/
Wind
Di
rect
ion Area
Batte
ry in the wind sensor is low.
UVI
/
B
arometer / Rainfall
Area
B
att
er
y in the UV / Rain sensor is low.
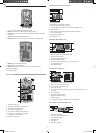
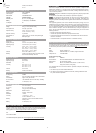
BASE STATION
CHANGE DISPLAY / SETTING
To change the display and settings, use the following buttons:
SELECT
,
MIN/MAX
,
MODE
and
ALARM
.
In additi
o
n
, the
UNIT
and
SEARCH
buttons located at the
back of the base station allows pre-setting of the remote sensor channels and the
measurement units for display.
TIP
To e
xit
from the setting mode, push any button. Alternatively, the base station
will automatically exit after 30 seconds.
CLOCK RECEPTION
This product is designed to synchronize its calendar clock automatically once it is
brought within range of a radio signal:
WMR90A:
• WWVB-60 generated from the atomic clock in Fort Collins, Colorado
.
The r
adio
signal range is 3219 km (2000 miles).
Press
RESET
whenever you change the selected setting.
The rec
eption icon will blink when it is searching for a signal. If the radio signal is weak
it can take up to 24 hours to get a valid signal reception.
in
dicat
es the status of the clock reception signal.
IC
ON
MEANING
Time is synchronized.
Receiving signal is strong
Ti
me
i
s
not synchronized.
Receiving signal is weak
To
enable (and force a signal search) / disable the clock radio reception (clock
synchronization):
1. Press
SELECT
to navigate to the Clock / Calendar / Alarm Area.
will show
next to the Area.
2. Press and hold
SEARCH
.
appears when it is enabled.
NOTE
For best reception, the base station should be placed on a fl at, non-metallic
surface near a window in an upper fl oor of your home. The antenna should be placed
away from electrical appliances and not be moved around when searching for a
signal.
WMR90A_EN_OP.indd 4 7/30/07 6:25:04 PM