


3
EN
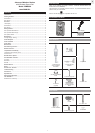
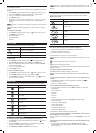
Humidity / Dew Point Area
1
2
3
4
5
6
1. Dew
point level - Temperature is showing
2. HI / LO humidity and Dew Point alarms are set
3. Comfort levels
4. Humidity trend
5. MAX / MIN humidity
6. Humidity reading
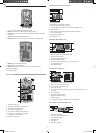
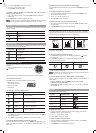
WIND SENSOR
1
2
5
6
3
4
1. Wind vane measuring the wind speed
2. Wind direction sensor
3. Battery compartment
4.
RESET
hole
5. North indicator
6. Plastic sleeve protecting the batteries
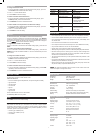
RAIN GAUGE
Base and funnel
1
2
3
1. Rain gauge
2. Battery compartment
3.
RESET
button
Tipping bucket rain gauge
1
2
1. Funnel
2. Level indicator
GETTING STARTED
SET UP REMOTE WIND SENSOR
The wind sensor can take 3 readings:
• The wind speed and directions
• The outdoor temperature (Channel 1 only)
• The outdoor relative humidity (Channel 1 only)
The sensor is battery operated and is capable of transmitting data to the base station
wirelessly within an approximate operating range of 100 meters (328 feet).
NOTE
For best results, ensure that the wind direction indicator on the wind sensor
points to the North to enable an accurate reading. The sensor also should be
positioned in an open area away from trees or other obstructions.
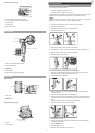
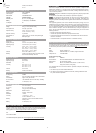
To set
up the wind sensor main body
:
1. Assemble the wind direction pointer on the top of the wind sensor.
2. Use the screw (Type B) to fi x.
3. Assemble the wind vanes on the top of the wind pointer.
4. Use the screw (Type B) to fi x.
1
2
2
2
2
3
5. Hold the wind sensor upright and rotate the protective sleeve to the left to unlock.
6. Slide the sleeve down to open the battery compartment.
7. Insert batteries (4 x UM-3 / AA) in the compartment, matching the polarity (+ / -)
and press
RESET
.
8. Slide the protective sleeve up to close the compartment.
9. Rotate the sleeve to the right to lock.
7
5
5
5
5
8
9
9
9
6
6
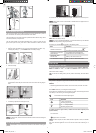
To set up the wind sensor main body on an existing pole:
1. Remove the screw that fi xes the plastic connector at the end of the top pole.
2.
Remove the plastic connector by sliding it off the pole.
3.
Insert the pole into the plastic base.
3
3
1
1
2
2
4.
Insert the screw into the plastic base and pole and secure using the Type B
screw and washers.
5.
Align the back of the plastic base to an existing pole.
6.
Using the 2 U-bolts, secure the plastic base to the pole by inserting the ends of
the U-bolts into the holes on the plastic base and securing it with washers and
bolts.
7.
Slide Integrated wind sensor into the plastic base and pole.
8.
Insert and screw the Type “X” bolt into the hole.
7
7
7
7
7
7
9
9
5
6
6
6
9. Slide the battery cover off.
10. Using a compass, rotate and align the wind direction sensor and the NORTH
indicator line to the North.
11. Press the RESET button.
12. Slide the battery cover up
13. Rotate the sleeve clockwise to clock the cover