


28
TRACKER 5100/5100i/5500/5500i Installation and Operation Manual
NAVMAN
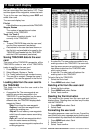
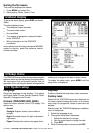
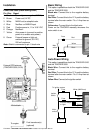
13-3 DGPS setup
Internal GPS
Disable or enable the TRACKER’s internal GPS
receiver. Disable this if a non-standard GPS antenna
that sends NMEA data is installed.
DGPS Source
Enables or disables the satellite based DGPS
correction (see section 7). The options are None or
WAAS/EGNOS. Do not enable WAAS/EGNOS
outside their coverage areas or the accuracy of the
position might be degraded.
WAAS covers all of the USA and most of Canada.
EGNOS will cover most of Western Europe when it
becomes operational about the end of 2003.
Restart GPS
Restarts the internal GPS receiver for servicing or
troubleshooting. The GPS receiver takes up to three
minutes to restart. The satellite display shows the
status of the GPS receiver (see section 7).
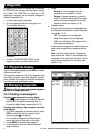
The options are:
On: displays attention area boundaries and
information icons
.
Off: does not display attention area boundaries
or information icons
.
Note: In some early chart cards the information icons
are inactive.
Depth area limits (TRACKER 5500, 5500i)
The depth area limits control the chart water colours
for different depths. There are three water colours:
Static Navigation
The displayed speed and course become erratic
when the boat stops. Turn Static navigation On to
display speed and course as zero when the boat is
stopped.
Position, Speed and Course Filter
Waves and wind cause the boat position, speed and
course to fluctuate slightly. To give stable readings,
the TRACKER calculates these values by taking
several measurements and averaging them.
A lower value averages measurements over a
shorter period of time. This gives the most
accurate value but has the most fluctuations.
A higher value averages measurements over a
longer period of time. This gives the most
stable value but will ignore some true speed
changes.
Set the Position, Speed and Course filters to the
lowest values which give stable readings. The range
of each filter is 1 to 60 seconds or Off (0).
Surface to Depth area limit 1:
Shallow water colour.
Depth area limit 1 to Depth area limit 2:
Medium water colour.
Below Depth area limit 2:
Deep water colour.
The actual water colours depend on the LCD colour
scheme in use (see section 13-1).
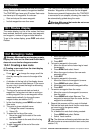
13-4 Fuel Setup
To use these fuel features first purchase and install
the optional single or twin engine fuel kit.
Whenever fuel is added or removed from the tank,
use this menu:
If the tank is filled, select Tank Full.
If the tank is partly filled or fuel removed:
1 Before adding or removing the fuel, go to
the fuel display and note how much fuel is
in the tank.
2 Note how much fuel is added or removed.
3 Calculate how much fuel is now in the tank
by adding or subtracting the two figures.
4 Select this menu and enter how much fuel
is now in the tank in Set Remaining.
Warning: Do this each time fuel is added or
removed or else fuel remaining and the low fuel
alarm will be meaningless!
Tank Full
Select Tank full each time the tank is filled full.
When asked for confirmation, Select Yes.
Set Remaining
Enter the amount of fuel now in the tank after it has
been partly filled or fuel has been removed.
Clear Used
Select Clear Used to set Used (the amount of fuel
used) to zero. Do this to restart measuring the amount
of fuel used.
When asked for confirmation, Select Yes.
Tank Size
Enter the capacity of the fuel tank.
Num Engines
Set the number of engines to None, One or Two.
If None is selected the fuel features are turned off.