


8
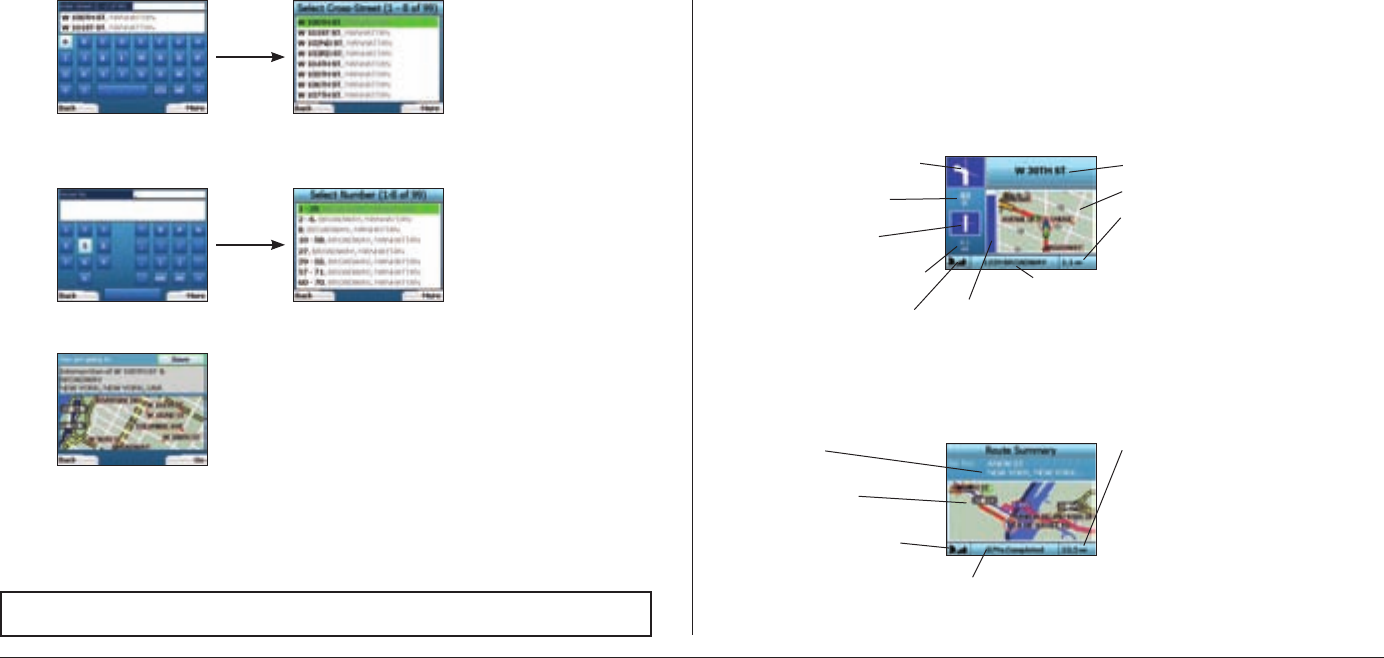
7. If there is a high number of intersections on your destination street, you will be returned to the Keyboard screen.
Enter the first few characters of the cross-street you are seeking and press the right Selection Button. A list screen similar to that of Step 6 will
display. You will go directly to this screen if there is only a limited number of intersections on your destination street.
Use the 4-way toggle to scroll to your target cross-street and press OK. This will bring you to the Destination screen. Proceed to Step 9.
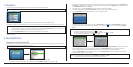
8. Use the 4-way toggle and the OK button to enter the number of the building that you wish to visit and press the right Selection Button
.
Use the 4-way toggle to select the number you wish to go to from the list and press OK.
9. When you select a destination, your iCN 320 will display a map with that destination highlighted.
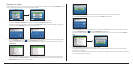
To choose a specific point on the Destination screen as your destination, use the 4-way toggle to highlight the map and press OK. A cursor will
appear. Use the 4-way toggle to point the cursor at your destination and press OK. Your iCN 320 will automatically update your destination to that
point.
Press the right Selection Button to confirm that you wish to go to this destination. Your iCN 320 will calculate your route, and guide you on your
journey.
Press the left Selection Button to return to the previous screen without calculating a route.
Navigation Screens
Once you have entered a destination, your iCN 320 will calculate your route. You can view your route in a number of ways. Use the left and right direction
buttons on the 4-way toggle to switch between screens.
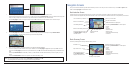
Next Instruction Screen
The Next Instruction screen displays information that you need for the next instruction, the direction to follow and the distance to the instruction.
This is the default screen displayed when your iCN 320 calculates a route. A route must have been calculated in order for it to be possible to open this screen.
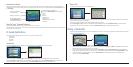
Route Summary Screen
This screen provides high-level summary information about your route.
NOTE: You can save this destination as a Favorite; use the 4-way toggle to select Save and press OK
.
You will be guided to the Favorites screen. See page 9 for more on saving destinations.
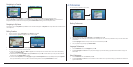
The next instruction you will follow.
The following instruction
Distance to the following instruction
GPS strength indicator. Press the
left Selection Button to display the
GPS Status screen.
Distance to next instruction.
Progress toward next
instruction.
Map of the next instruction
Your current location
Additional information can display here.
Press the right Selection Button to scroll the options:
• Speed;
• Time;
• Heading;
• Distance to Turn;
• Distance to Go;
• ETA (Estimated Time of Arrival);
• Time to Go.
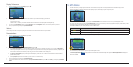
Name of your next location
Percentage of trip completed
GPS strength indicator. Press
the left Selection Button
to
display the GPS Status screen.
Map of entire route
Destination
Additional information can display here.
Press the right Selection Button to scroll the options:
• Speed;
• Time;
• Heading;
• Distance to Turn;
• Distance to Go;
• ETA (Estimated Time of Arrival);
• Time to Go.