


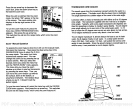


SURVEYING A LAKE
The most successful
anglers
on
any body
of water are those who fish
it
day
after
day
and
year
after
year. Eventually, they
learn the hot
spots
that
produce
fish
consistently. They
discover
through experi-
ence
where,
and at what
depth, they
can
expect
to find the fish
they
want at
any
season. And
they
realize that these
productive
areas
change throughout
the
year depending
on water
level, temperature,
food,
and other factors.
With the
X-25,
anyone
can eliminate
guesswork
and concentrate on
the areas where fish are
likely
to be. Even
if it's the first time on the
lake!
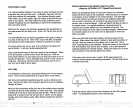
The most efficient
way
to
become
acquainted
with a
body
of water is
to
survey
it with
your
X-25. Start
with a
map
of the
lake,
if
possible,
and indicate
the
promising
spots
in relation to landmarks on shore.
As
you go
about
your
survey, your
X-25 will tell
you
the
depth
and
type
of bottom.
It will also reveal
suspended
fish.
Keep
a few marker
buoys
in the
boat, ready
to toss overboard. When
the X-25 indicates a school
of
fish,
throw the
buoy
out. With the
school thus
marked,
you
can make
your
turn and
come back to fish in
exactly
the
right spot.
This is essential when
you're
far from shore on
a
big
lake. Unless
you
mark the school
of fish when
you're
over
it,
you may
not be able to find it
again.
BAIT FISH
The
importance
of bait fish to successful
fishing
can't be
over-empha-
sized.
They
are the
principle
food of all
game
fish in most waters.
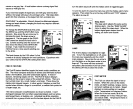
Bait fish are the
plankton
feeding forage fish,
such as minnows and
shad. Bait fish can also
be the
young
of
game
fish,
such as
crappies,
bluegill,
and bass.
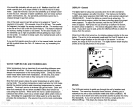
Most bait fish concentrate
within five feet of the surface where
sunlight
promotes
the
growth
of the
plankton
on which
they
feed. One method
of
fishing
is to use the
X-25
tQ find the bait fish first. With the Fish ID
feature
off,
a school of bait fish
will
look like
a "cloud" on the
display.
Usually, game
fish will be
nearby,
often
directly
beneath the school of
bait fish.
22
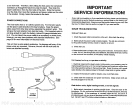
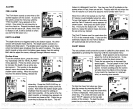
SPEED/TEMPERATURE
SENSOR INSTALLATION
(Requires
OPTIONAL
LST-T
Speed/Temp
Sensor)
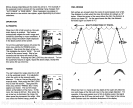
Mount the
speed/temp
sensor on the boat's transom
in a location
where the flow of water
is the smoothest.
There should be a minimum
of turbulence
and air bubbles in the chosen location.
The
port (left)
side of the transom is
preferred,
however,
the starboard
(right)
side
can be used
if
necessary.
Do not mount the
speed
sensor behind
strakes, ribs,
or thru-hull
fittings.
These will disturb the
flow of water to
the
speed
sensor. In a
typical
installation,
the
speed
sensor
is
mounted six to twelve
inches from the centerline of the
hull. The
sensor must
always
be
in
the
water to function
properly.
Make
certain
the chosen location is in the water even
at
high speed
or when the
boat is on
plane.
Once
you
determine the
proper
location, place
the sensor
on the
transom. Make certain the
sensor's bottom is flush with the
bottom of
the
hull. Mark the transom
in four
places,
two in each slot.
Drill a
5/32"
mounting
hole at
each location. Mount the sensor to
the hull with
four #10 stainless steel screws
(not included).
Use a
good
grade
of
caulking compound
to seal the screws.
Adjust
the sensor
so it is flush
with the bottom of the hull
and
tighten
the screws.
If the base of the transom has a
radius,
fill the
gap
between the
transom and the sensor with
caulking compound.
This will
help
insure
a smooth water flow.
Route the sensor cable to the
in-line connector on the X-25's
power
cable. The
speed/temp
sensor is now
ready
for use.
3
PDF compression, OCR, web-optimization with CVISION's PdfCompressor