


16
From the information screen, you can choose to
GO TO the selected loca-
tion, which makes the iWAY generate a route. This is the easiest way
to generate a route to a destination, and we'll use it in the "Map Mode
Practice Run." See the heading "Navigating to a Contact" below for de-
tails. The command
FIND ON MAP can be used to center the map on the
selected location.
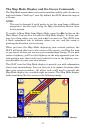
Creating and Saving Contacts
You can use the Location Information button to access information con-
cerning anything from a Point of Interest to a simple cursor position. If
you've selected a cursor position, a button labeled "Add to Address
Book" will appear on the Location Information Screen. Choose
ADD TO
ADDRESS BOOK from the Location Information Screen to save a contact at
the selected location.
NOTE:
You can also create a contact at your current position. If your map
cursor is active, choose
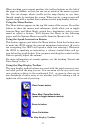
CLEAR CURSOR from the Map Display Toolbar,
and the toolbar and cursor will disappear. The Save
Location button replaces the Location Information button.
This new button looks like the one at right. Press it to save
a contact at your current position.
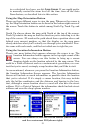
An Edit Contact screen will appear, which includes a textbox contain-
ing the contact's name, address and phone number. You can choose to
leave the address and phone number fields blank, but any information
you add to them will display whenever you open the Location Informa-
tion screen for that contact. There is also a Choose Symbol button and a
small icon showing the contact's current symbol. The contact's lat/lon
coordinates are also listed to the right.
To change the contact's name, address, or phone number, simply touch
anywhere inside the relevant box, and the iWAY's virtual keyboard will
appear, allowing you to enter new information or modify the old.
To change the contact's symbol, select Choose Symbol and a dialog will
appear showing the available symbols. Choose the one that best repre-
sents the selected location then close the dialog by pressing the "X" in
the upper right corner. The new symbol will now appear below the
Choose Symbol button (and on the main map display).
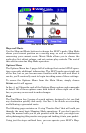
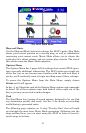
Selecting a Contact
You can select any contact by touching its symbol on the map display.
When you do, the map cursor will appear pointing directly to the con-
tact and the symbol will be outlined with a red halo. The contact's
name will also appear in the pop-up box.