MAINTENANCE WORK ON CHASSIS AND ENGINE »
ENGLISH
47
1
2
3
4
Carburetor – Adjust idling (Keihin-FCRMX 37/39/41) *
Idling adjustment of the carburetor strongly affects the engine’s starting
behavior. That is, an engine whose idling speed is adjusted correctly will be
easier to start than one whose idling speed has not been adjusted correctly.
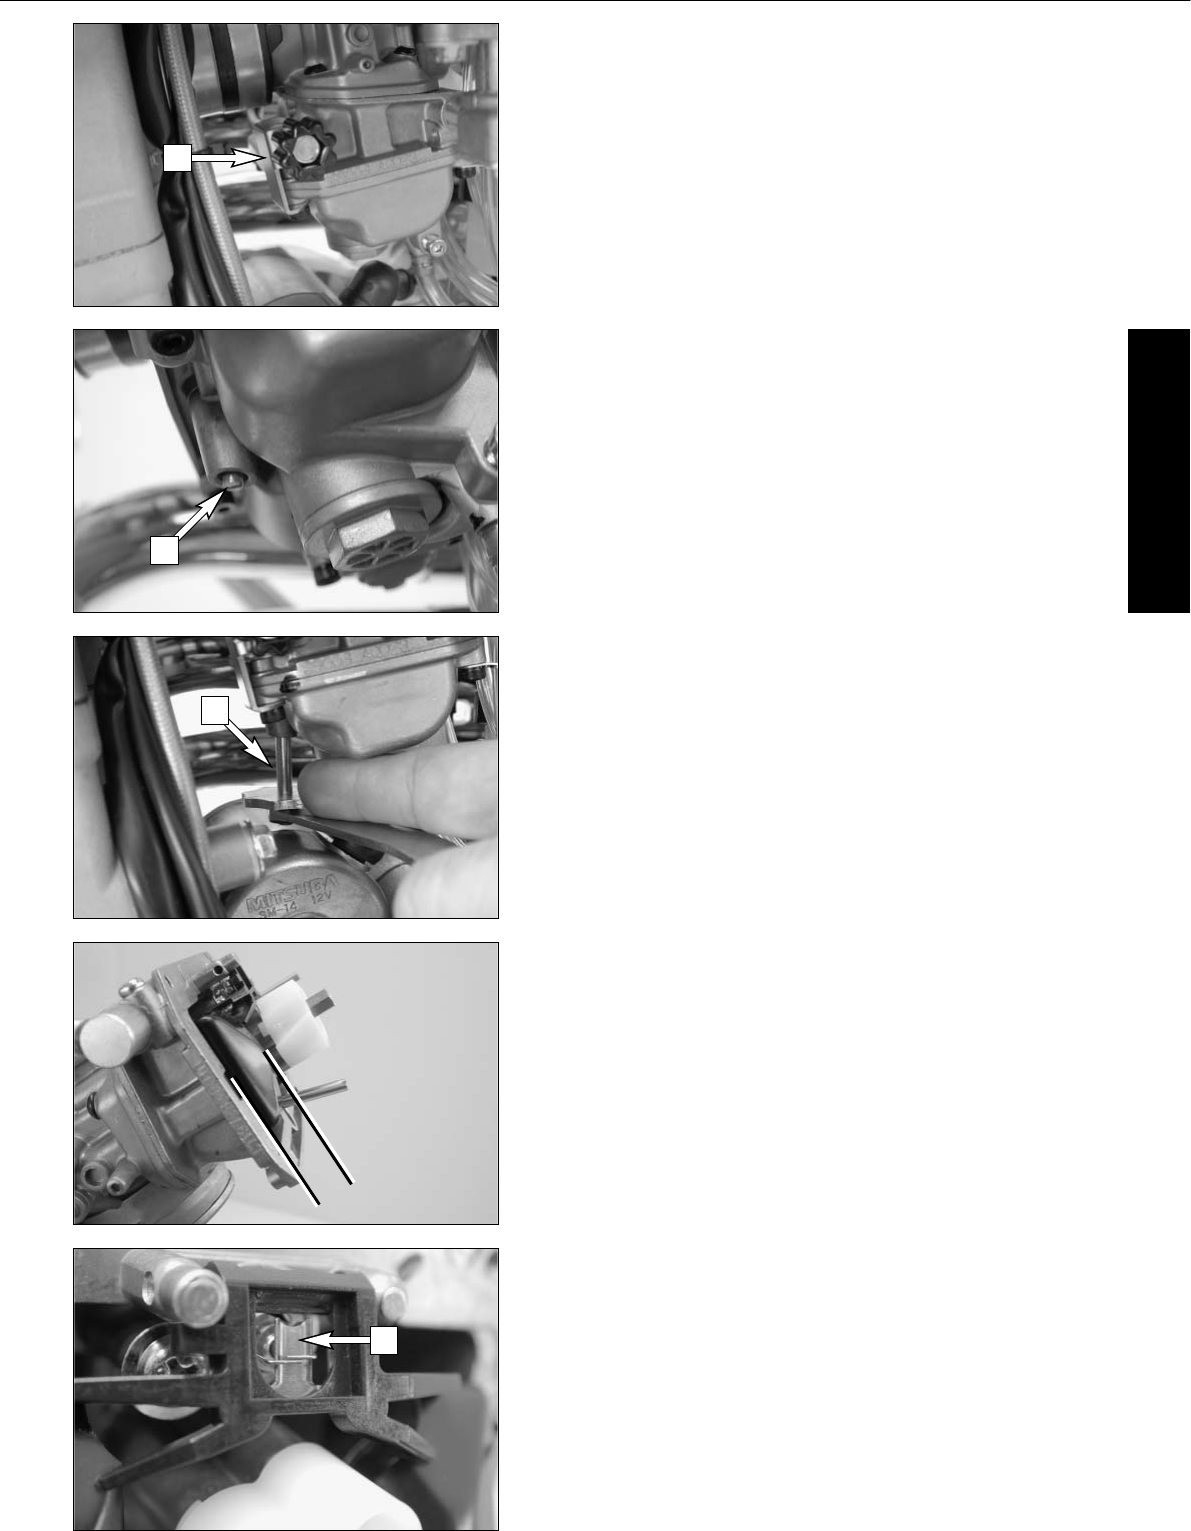
The idle speed is controlled by means of the adjusting wheel [1] and the
mixture control screw [2]. The adjusting wheel is used to adjust the basic set-
ting of the slide. The mixture control screw is used to control the idle mixture
which arrives at the engine by way of the idle system. Clockwise turning reduces
the fuel quantity (lean mixture), counterclockwise turning increases the fuel
quantity (rich mixture).
TO ADJUST IDLING CORRECTLY, PROCEED AS FOLLOWS:
1 Turn in mixture control screw [2] up to the stop, and turn it back out to
the basic position (see technical date-engine)
2 Warm up the engine
3
Use the adjusting wheel [1] to set the normal idle speed (1400 - 1500 rpm).
4 Turn mixture control screw [2] slowly clockwise until idling speed starts
to decrease. Memorize this position, and turn mixture control screw slowly
counterclockwise until the idling speed decreases again. Adjust the point
of the highest idling speed between these two positions. If, in the course
of this procedure, the speed undergoes a relatively high increase, reduce
the idle speed to a normal level and repeat the procedure specified in 4.
Serious competitive racers will choose a setting approx. 1/4 turn (clock-
wise) leaner than this ideal value because their engine will heat up more
when used in competitions.
NOTE: If you fail to obtain a satisfying result by following the procedure
described above, an incorrectly dimensioned idling nozzle may be the cause.
If:
a) the mixture control screw has been screwed in up to the stop without
causing any change in rotational speed, a smaller idling jet has to be
installed;
b) the engine dies when the mixture control screw is still open by
2 turns, a larger idling jet needs to be selected.
Naturally, in cases of jet changes, you have to start your adjusting work
from the beginning.
5 Then, use the adjusting wheel to set the desired idle speed.
6 In cases of greater changes in the outside temperature and extremely
different altitudes, the idling speed should be readjusted.
Basic information on carburetor wear
As a result of engine vibrations, the throttle valve, jet needle, and needle jet
are subjected to increased wear. This wear may cause the carburetor to mal-
function (e.g., overly rich mixture). Therefore, these parts should be replaced
after approx. 200 hours.
Adjusting the mixture control screw *
Especially on the EXC models, accessing the mixture control screw is diffi-
cult. For this reasons, we have created an appropriate special tool.
Introduce the special tool on the mixture control screw [2] at the carburetor
bottom. Press the tool slightly upward and turn the adjusting wheel [3] until
the tool engages the slot of the mixture control screw.
Now, you can go about adjusting the screw. Marks were provided on the
adjusting wheel, making it easier to keep track of the turns.
Checking the float level (float height) *
For this purpose, dismount the carburetor and remove the float chamber. Hold
the carburetor in a slanted position such that the float will abut the float nee-
dle valve but not compress it.
In this position, the edge of the float should be parallel with the float cham-
ber sealing surface (see illustration).
If the float height does not correspond to the desired value, check the float
needle valve and, if necessary, replace it.
If the float needle valve is o.k., you can adjust the float height by bending the
float lever [4].
Mount the float chamber, install the carburetor, and adjust the idle speed.


