135
Return to the Top page
Setting Up
R-CAM Interruption
Set a method for switching the display. Setting
values are ON and OFF.
ON: Switches to the rear view camera video
display when shifting to reverse or
pressing the <NAV>*
5
button for 1 second.
OFF (Default): Switches to the rear view
camera video display when
pressing the <NAV>*
5
button
for 1 second.
R-CAM Settings*
2
Adjust the CMOS-3xx series with ID 1 set. For
details, see the instruction manual of your
camera.
Parking Guidelines*
3
You can display parking guidelines to enable
easier parking when you shift the gear to the
reverse (R) position.
Default is “ON”.
Guidelines Setup*
3
Adjust the parking guidelines. See Adjusting
the parking guidelines (P.135).
Front Camera
Select the type of front camera to use.
CMOS-310: When the CMOS-3xx series with ID
2 set is connected.
Other: When the other camera is connected.
OFF (Default): When the front camera is not
used.
F-CAM Settings*
4
Adjust the CMOS-3xx series with ID 2 set. For
details, see the instruction manual of your
camera.
*1 These settings become settable only when
the parking brake is on.
*2 This setting becomes settable only when
the parking brake is on and “Rear Camera”
is set to [CMOS-310].
*3 This setting becomes settable only when
the “Rear Camera” is set to [Other].
*4 This setting becomes settable only
when the parking brake is on and “Front
Camera” is set to [CMOS-310].
*5 [NAV Key Longer than 1 Second] must be
set to “CAM”. See User interface (P.129).
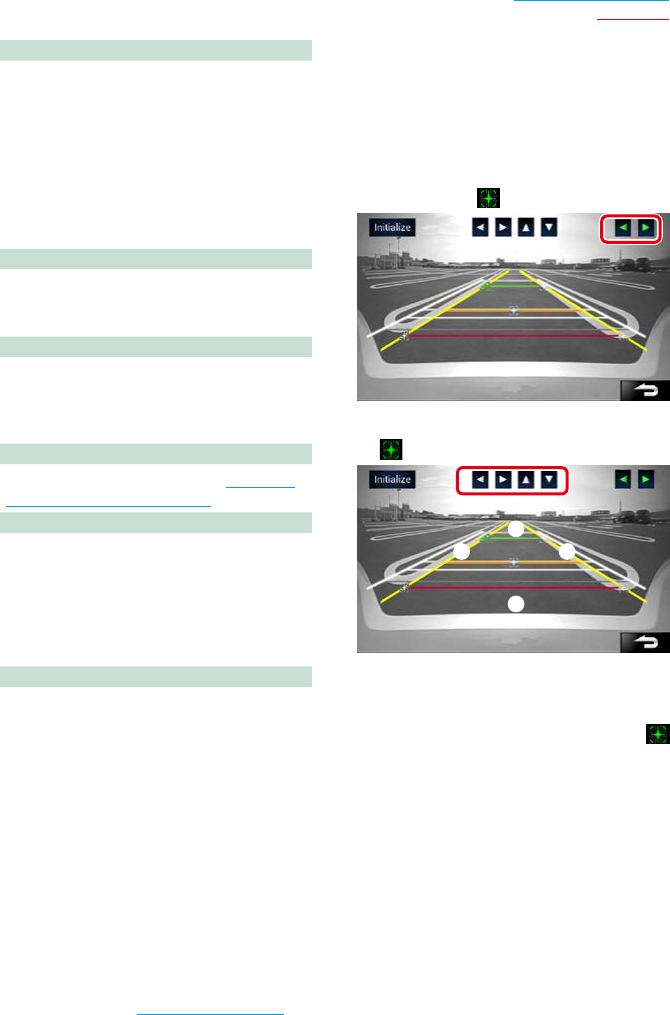
Adjusting the parking guidelines
1
Touch [ON] of [Parking Guidelines] in
the Camera SETUP screen.
2
Touch [Adjust] of [Guidelines Setup] in
the Camera SETUP screen.
3
Adjust the parking guidelines by
selecting the mark.
4
Adjusting the position of the selected
mark.
A
B
C D
Make sure that A and B are horizontally
parallel, and that C and D are the same
length.
• Touch and hold [Initialize] to set all the
marks to the initial default position.•


