


Battery Charger – Electric Vehicles
Page 38 2005 Husqvarna 4210-G, 4210-E, 4210-GXP, and 4210-EXP Owner’s Manual
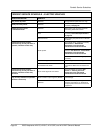
NOTE: When temperatures fall below 65 °F (18.3 °C), batteries charged in unheated areas should be
placed on charge as soon as possible after use. Batteries are warmest immediately after use, and
cold batteries require more time to fully charge.
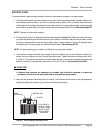
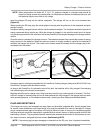
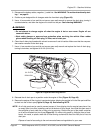
Insert the charger DC plug into the vehicle receptacle. The charger will turn on two to ten seconds later
(Figure 22).
When inserting the DC plug, align the raised guide on the plug with the guide slot in the receptacle and push
straight in slowly.
Husqvarna battery chargers interact with the vehicle onboard computer. The computer records the amount of
energy consumed during vehicle use. While the charger is plugged in, the vehicle’s control circuit is locked
out, preventing operation of the vehicle as well as the possibility of consequent damage to the charger and the
vehicle.
Once the lockout is actuated, the charger turns on. The onboard computer then records the amount of energy
being returned to the batteries. When the optimum amount of energy needed to replenish the batteries is
returned, the charger will shut off. The control circuit lockout remains activated until the charger plug is dis-
connected from the vehicle.
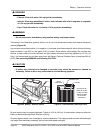
Husqvarna electric vehicles are supplied with a PowerDrive 2 battery charger (Husqvarna 603 00 20-09). Use
PowerDrive 2 chargers with this electric vehicle.
As long as the PowerDrive 2 is allowed to shut off by itself, the batteries will be fully charged. Overcharging
and undercharging will normally be prevented.
Batteries should be put on charge even if they have been used for only a short period (10 minutes). The Pow-
erDrive 2 charger is automatic and will turn off when batteries are fully charged. If the charger does not seem
to be operating properly, or if the batteries seem weak, contact your local Husqvarna distributor/dealer.
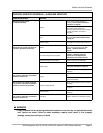
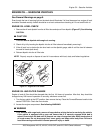
PLUG AND RECEPTACLE
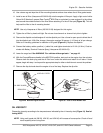
The charger cord, plug, and receptacle are wear items and should be inspected daily. Visually inspect them
for cracks, loose connections, and frayed wiring; they must be replaced when worn or damaged. If charger
plug or receptacle show signs of corrosion or the plug is difficult to insert or remove, the receptacle contacts
and plug terminals should be cleaned with a good electrical contact cleaner or lightly sprayed with WD-40
®
brand spray lubricant. The plug should then be inserted and removed several times to ensure ease of inser-
tion, ease of removal, and good electrical contact. See following NOTE.
NOTE: If the warning tag has been damaged or removed from the DC cord, have it replaced immediately.
Figure 22 Correct Insertion of Charger DC Plug Figure 23 Incorrect Insertion of Charger DC Plug