


7
CHARGING IF BATTERY IS OUTSIDE OF VEHICLE
Set charger's Charge Rate Selector switch to appropriate setting according to battery size. Make sure the Charge/
Start switch is in the Charge position.
a) Check polarity of battery posts- For top-mounted battery connectors, the positive post (marked POS, P, +)
usually has a larger diameter than the Negative battery post (marked NEG, N, –). For side-mounted battery
connections the Positive terminal is red, the Negative terminal is black.
b) Attach a 24-inch (minimum length) 6 AWG insulated battery cable to the Negative battery post
(marked NEG, N, -).
c) Connect the Positive (RED) battery clamp to the Positive battery connector (marked POS, P, + or red).
d) Stand as far back from battery as possible, and do not face battery when making final connection.
e) Carefully connect the Negative (BLACK) charger clamp to the free end of the battery cable connected to the
negative terminal. Connect the charger's power cord to a grounded 110/120 volt AC power outlet, and
refer to Appendix A for approximate charging times.
f) When charging is complete, disconnect cables and clamps in reverse order from which they were connected.
CHARGING TIMES
The HSK074HD is a fully automatic battery charger. It automatically adjusts the charge rate as the battery
becomes charged and stops charging when the battery is fully charged. If you require some estimate of the time
it takes to charge a battery refer to Appendix A for these details.
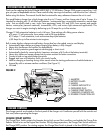
ENGINE START
The Engine Start function can supply up to 55 amps of current during engine starting. This function is protected by
a thermal circuit breaker and there is a five-minute limit at this output level. Follow all precautions as if charging a
battery in a vehicle, except that the Charge/Start Switch is placed in the Start position and the Charge Rate Switch
is placed in the Engine Start position. DO NOT MAKE BATTERY AND CHASSIS CONNECTIONS WITH CHARGER
PLUGGED INTO AC. Make the final connection to battery and chassis and plug in the charger. Immediately crank
the engine in three-second bursts until it starts. Disconnect the charger's AC connection first and then the chassis
and battery connections. If the engine fails to start, you may change switch positions and charge the battery without
disconnecting the charger from AC.
After charging, if the charger is already powered and connected to the battery, you may safely move the charger's
switches to the Start and Engine Start positions without disconnecting the charger from AC. After the engine starts,
disconnect AC, then the chassis and battery connections.